This post may contain affiliate links. Please read my disclosure policy.
All recipes on Doggone Baking are intended for humans — the dogs are just our enthusiastic photo assistants and taste-test spectators.
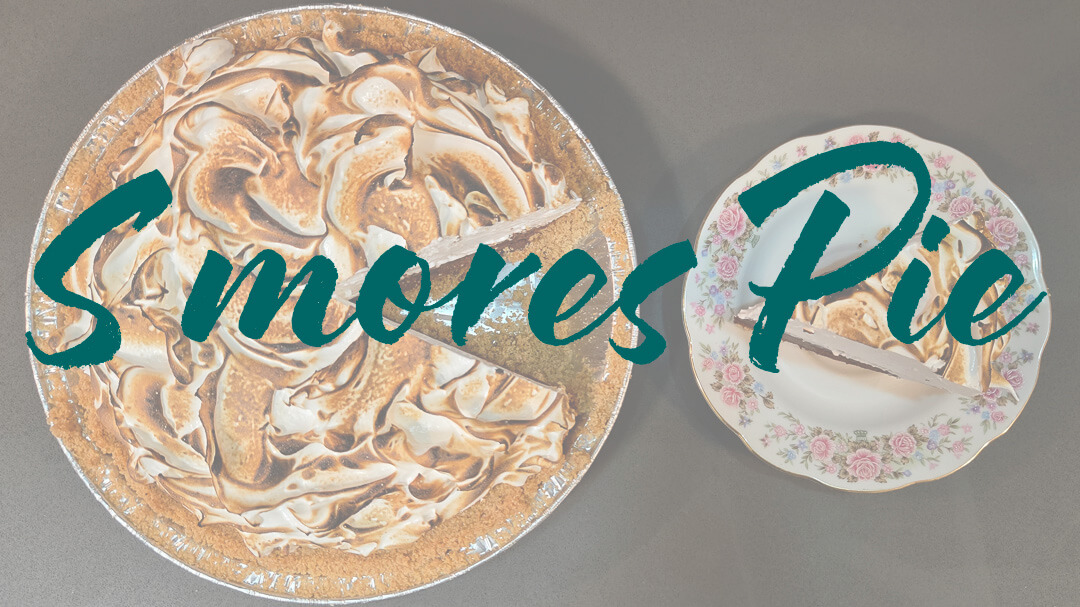
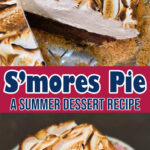
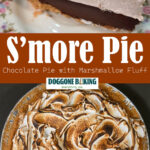
Easy S’mores Pie Recipe | Pie School Series
Welcome to Pie School! If you’ve ever said, “I can’t cook,” or if you just want a fun baking project to do with your kids, you’re in the right place. Today we’re making an easy s’mores pie that anyone can handle. You don’t need fancy tools or any baking experience, just a little patience and a desire to eat a s’more the size of a pie.
S’mores pie is a ridiculously easy and fun summer pie that’s basically one giant s’more. I’ll give you a few tweaks here and there to make this pie fully homemade, or to make it even easier by using some store-bought components. Bring it to your next summer bonfire or backyard party and everybody will think you put in way more effort than you did.

Origin of S’mores Pie
As far as I can tell, the first published recipe for s’mores pie appeared in the cookbook Icebox Pies by Laurent Chattman back in 2002. That version was an ice cream pie, folding chocolate into vanilla ice cream for the filling. Then in 2006, Epicurious published a recipe using chocolate ganache instead of ice cream, and in 2008, Smitten Kitchen put out their own version. S’mores pie has picked up in popularity ever since!
If you google s’mores pie recipes today, you’ll get pages and pages of results. Some versions use a chocolate brownie as the base, essentially turning a brownie pie into a s’more by topping it with toasted marshmallows. Other recipes, like this one, go the chocolate ganache route. A small handful are still ice cream versions. Any way you slice it though, s’mores pie is about as summery as dessert gets.
What Goes into this S’mores Pie?
A s’mores pie is basically one giant s’more in pie form. It’s a pretty modern recipe that, from what I can tell, came about in the post-internet age. There are a few different common versions out there: an ice cream pie, a chocolate brownie-based pie, and a chocolate ganache-based pie. This recipe is for the chocolate ganache version.
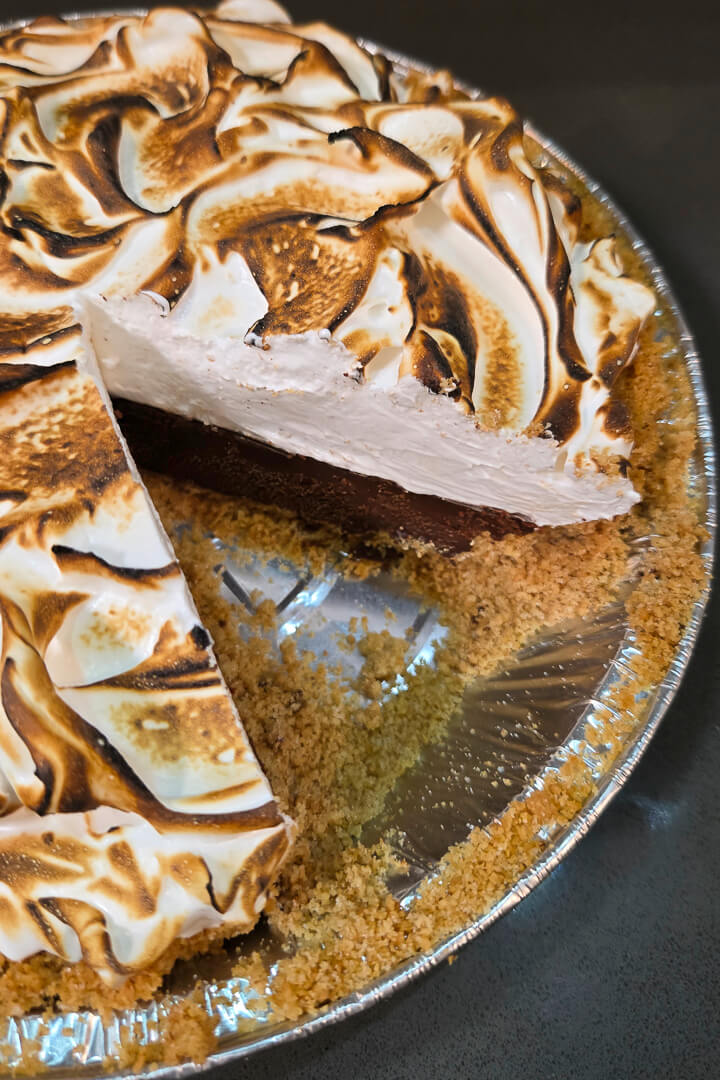
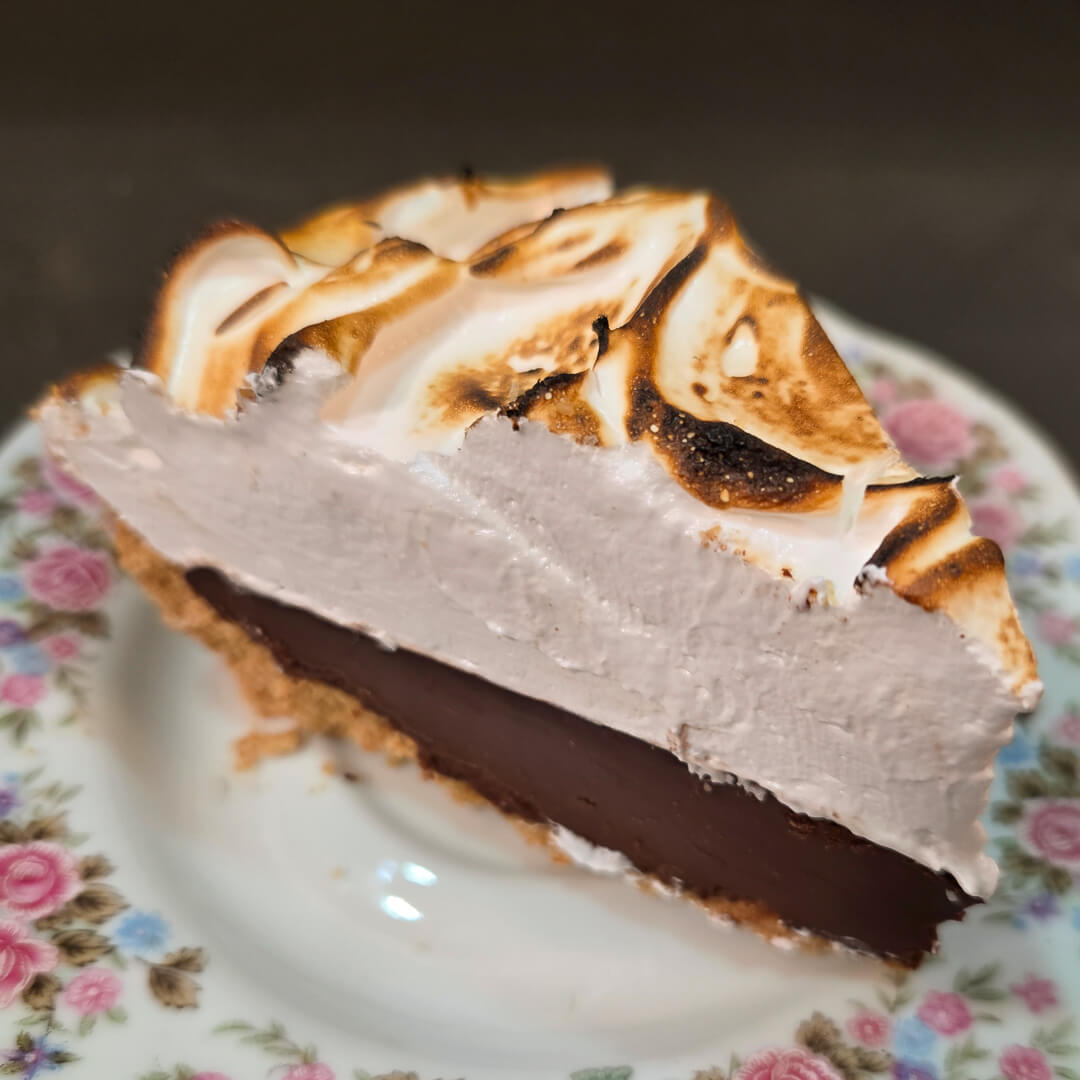
Pies can feel like a daunting task for beginner bakers, but it helps to break things down into parts. This s’mores pie has three components: a graham cracker crumb crust, a chocolate ganache filling, and a toasted marshmallow fluff topping. We’ll walk through each of those three parts step by step in easy to follow tutorials below.
- Crust: All pies need a crust, and a s’more wouldn’t be complete without its graham cracker base. For this s’mores pie, we use a crust made with crushed graham crackers. You can easily make this dessert gluten-free by swapping in gluten-free graham crackers.
- Chocolate Ganache: Chocolate ganache is simply a thick, silky chocolate made by pouring hot cream over chopped chocolate and stirring it together until smooth. We’ll break it down in more detail in this post, but I also have an entire post dedicated to chocolate ganache if you want to go deeper, covering everything from the best chocolate ratios to the science behind how it works.
- Toasted Marshmallow Fluff: The best part of a s’more, in my opinion, is the marshmallow! This pie spreads marshmallow fluff over the top of the chocolate ganache and then toasts it until golden. We’ll walk through how to make homemade marshmallow fluff from scratch, but if that feels like too much, store-bought marshmallow fluff works just fine.
Graham Cracker Crust for S’mores Pie:
Every pie starts with a crust, and a s’more wouldn’t be complete without its graham cracker base. We’ll go through the basics here, but if you want a more detailed walkthrough, check out my full post on graham cracker crust.
Graham cracker crusts are simple, quick, and beginner-friendly, making them the perfect starting point for new bakers. There’s no dough to roll out, no need to shape edges, and no blind baking required. You can even mix the crust with just a fork! This versatile base pairs especially well with cream or custard-style pies such as key lime pie, chocolate cream pie, no-bake peanut butter pie, and even modern variations of pumpkin pie.
How to Make Graham Cracker Crumbs for Pie Crust
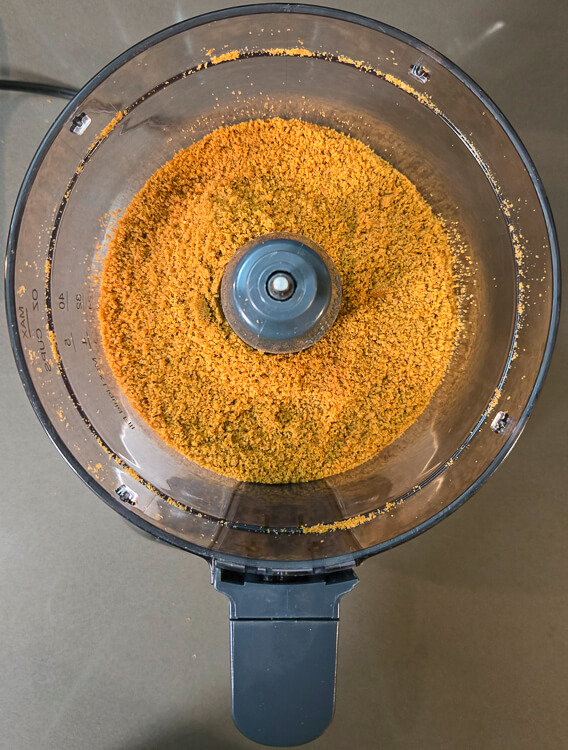
The quickest and most efficient way to make graham cracker crumbs is with a food processor. Break the crackers into a few pieces by hand, then pulse them in batches until they’re finely ground. This method gives you even crumbs with minimal effort.
If you don’t own a food processor, there are still easy alternatives. Many brands, including Honey Maid, sell pre-crushed graham cracker crumbs, and you can also find bulk packages online through retailers like Amazon. Buying them ready to use saves time and eliminates an extra step.
If you don’t have a food processor and can’t find pre-crushed crumbs either, you can crush the crackers with a rolling pin. Place them in a large zip-top bag, leave a small opening so air can escape, and roll over the crackers until they’re ground to the texture you want. A traditional rolling pin with handles works best for this since the extra weight makes it easier to break the crackers down into fine crumbs.
If you plan on making pies regularly and don’t already own one, investing in a food processor is well worth it. It saves time, produces perfectly even crumbs, and can be used for all kinds of baking tasks. I use the Cuisinart 8-cup food processor at home and love it. If you’re looking for a more budget-friendly option, the 4-cup version is a reliable entry-level choice that still gets the job done.
How to Make a Homemade Graham Cracker Crust
Ingredients
- 1½ cups Graham Cracker Crumbs (~210g)
- ¼ cup Unsalted Butter, melted (2oz)
- ¼ cup Granulated Sugar (50g)

1.
Start by grinding your graham crackers into fine crumbs. The easiest method is to use a food processor, working in small batches so you don’t overfill the bowl. You’ll need about 1½ cups of crumbs in total. If you don’t have a food processor, place the crackers in a large zip-top bag, leave a small opening for air to escape, and crush them evenly with a rolling pin. You can also save time by buying pre-crushed graham cracker crumbs from the store.
2.
In a medium mixing bowl, combine the graham cracker crumbs with ¼ cup of melted butter and ¼ cup of granulated sugar. Stir with a fork until the crumbs are evenly coated and resemble damp sand.

3.
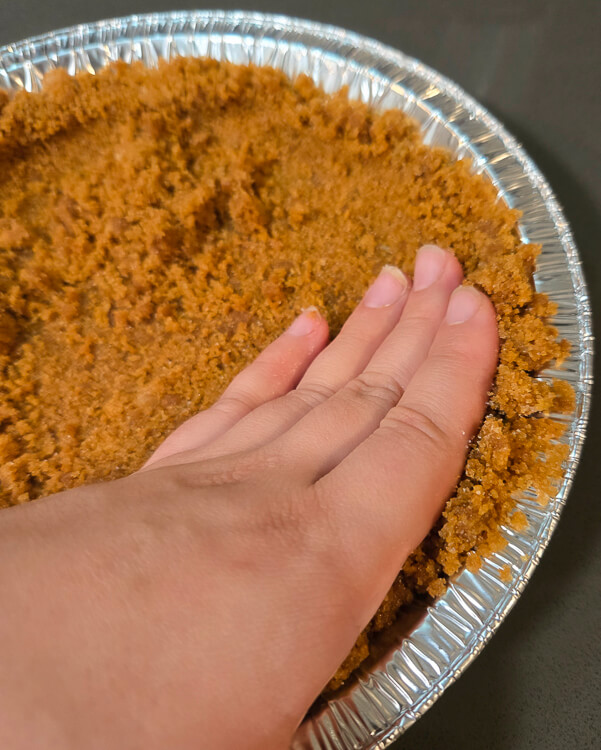
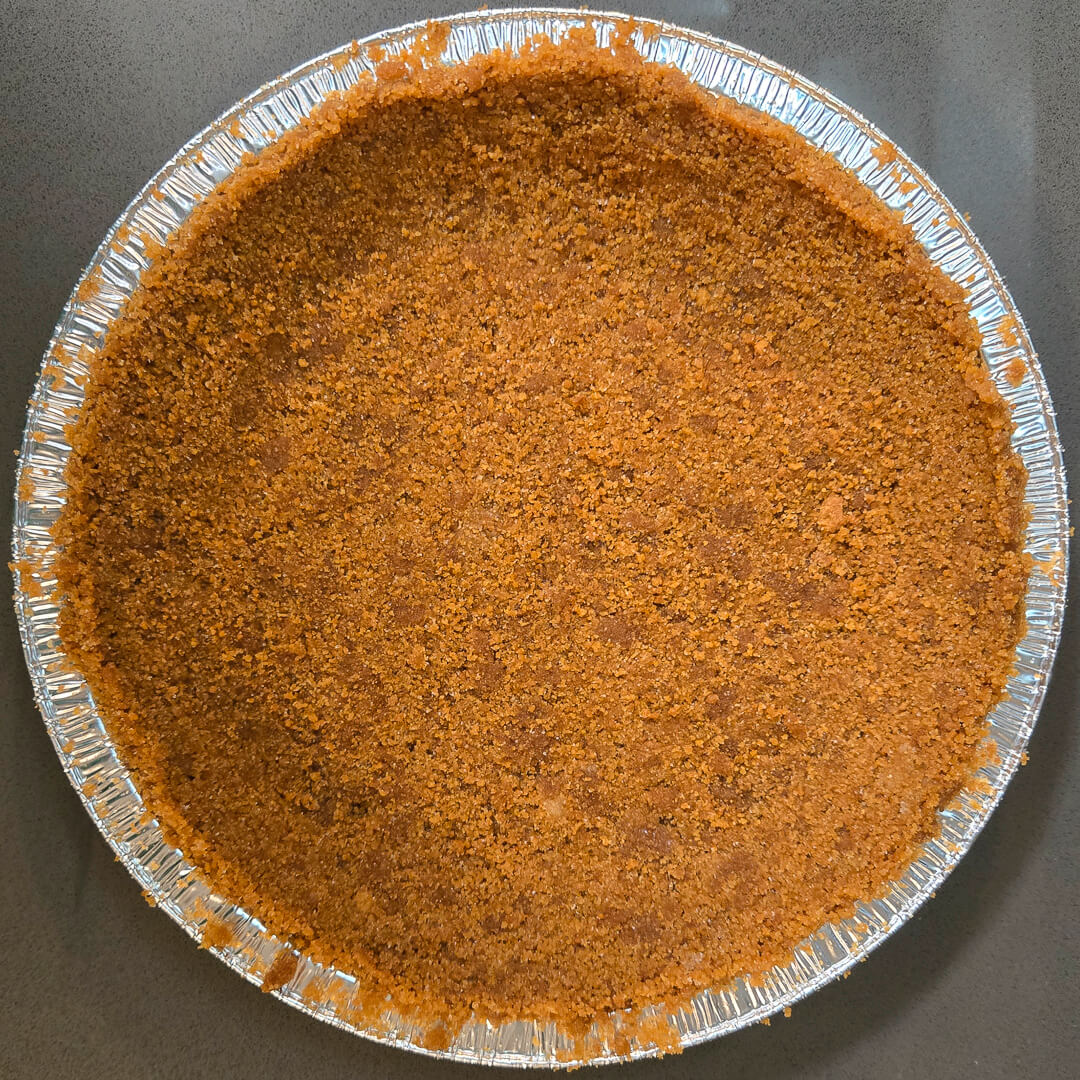
Press the mixture firmly into the bottom and up the sides of a 9-inch pie pan. The easiest method is to start by pressing the crumbs into the center, then working outward until they climb up the edges of the pan. A flat-bottomed measuring cup or glass can help pack the crumbs tightly and evenly.
4.
Bake the crust for 5–7 minutes at 350°F. This step is optional but helps give the crust extra crispness.
Using a Store Bought Graham Cracker Crust for Pies
If you’re feeling intimidated by the process of making your own graham cracker crust, you can also often find pre-made graham cracker crusts at major grocery stores. Look for one without too many cracks and with crumbs that go all the way up the sides. These crusts are affordable, quick, and ready to use.
To make it taste a little more homemade, place the crust on the middle rack of a 350°F oven for about 8 to 10 minutes. This helps it brown and crisp up a bit. Let it cool completely before adding your chocolate ganache filling.
Chocolate Ganache Filling for S’mores Pie
Chocolate ganache is a baking staple that is both easy to master and looks professional. It’s made from just two ingredients, chocolate and cream, but delivers stunning results. Knowing how to make chocolate ganache is extremely useful and a well-made ganache adds a rich, glossy finish that instantly makes any dessert look more polished and professional. Even though it comes together in minutes, chocolate ganache has the power to transform a homemade pie into something that looks bakery-worthy.
We’ll go through some tips on making chocolate ganache along with a recipe here, but if you want a deeper dive into understanding chocolate ganache, you can read my entire post on ganache.
What Kind of Chocolate Should You Use for S’mores Pie?
For this s’mores pie filling, we recommend semi-sweet chocolate for its versatility. If you’ve ever wondered why chocolate has so many different names, it mostly comes down to cacao percentage. If you want to experiment with other kinds of chocolate, milk chocolate, semi-sweet chocolate, dark chocolate, and bittersweet chocolate will all work well.
- Milk Chocolate: Contains at least 10% cacao and around 12% milk. Higher-quality milk chocolates often fall in the 30–40% cacao range. They’re sweet, less bitter, and melt at lower temperatures due to higher milk and sugar content.
- Semi-Sweet Chocolate: Usually 35–60% cacao, with higher-quality options closer to 50–60%. This is a versatile, balanced chocolate and works well as an all-purpose choice for baking applications.
- Bittersweet Chocolate: Often what we think of when we think of “dark chocolate.” Tends to be 65-80% cacao. 68-72% is a typical range, with percentages closer to 80% often being labeled as “extra dark.” A deeper chocolate flavor, but more bitter.
- Dark Chocolate: Not formally defined by the FDA, but commonly refers to any chocolate with more than 45% cacao.
Should You Use Chocolate Chips or Chocolate Bars for Chocolate Ganache?
Chocolate chips are designed to hold their shape during baking and often include stabilizers like soy lecithin. Chocolate bars, by contrast, don’t always contain stabilizers and usually have a higher cocoa butter content. Chocolate ribbons fall somewhere in between and also tend to include stabilizers. For the smoothest, most consistent chocolate ganache, chopped chocolate bars are usually your best bet, though high-quality chips and ribbons can still give you excellent results.
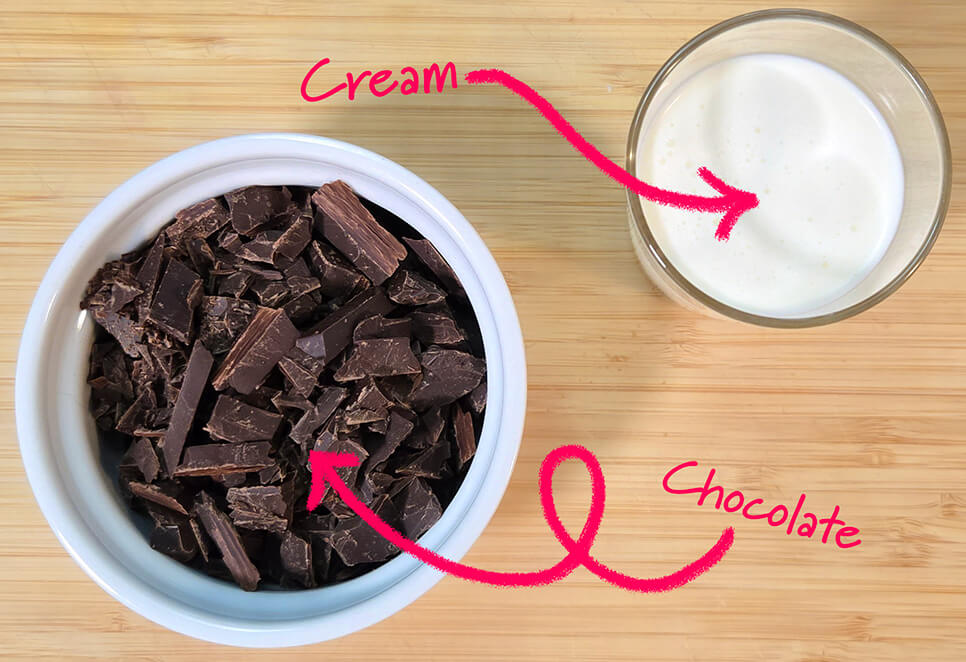
How to Make Chocolate Ganache Filling for S’mores Pie
Ingredients
- 8oz Semisweet Chocolate, chopped (227g)
- 1 cup Heavy Whipping Cream
1.
Chop your chocolate into small, even pieces and place them in a heatproof mixing bowl. If you’re using chocolate chips or melting wafers, you can skip the chopping step since they’re already sized to melt easily.
2.
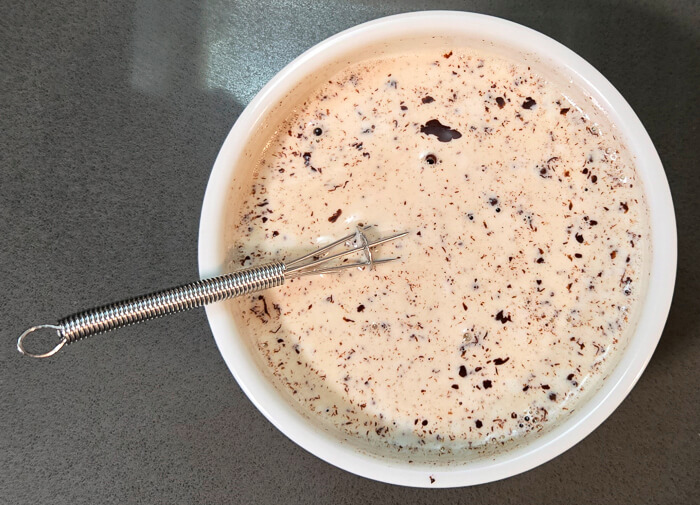
In a small saucepan, warm heavy whipping cream until it just reaches a simmer. Avoid letting it come to a full boil, since cream that’s too hot can cause the ganache to break or become grainy.
If you do accidentally let your cream boil, it’s not a big deal! Just take it off the heat and let it cool for a minute or two before adding it to your chocolate.
3.
Slowly pour the hot cream over the chopped chocolate while gently whisking. Continuous whisking helps the chocolate melt evenly and encourages the emulsion to form. Your ganache will hit an ugly middle stage where it looks a bit like cookies and cream, with bits of chocolate floating in the cream. Don’t worry, this is normal, just keep whisking! Within a minute or two you should have a smooth, glossy chocolate ganache ready to use.
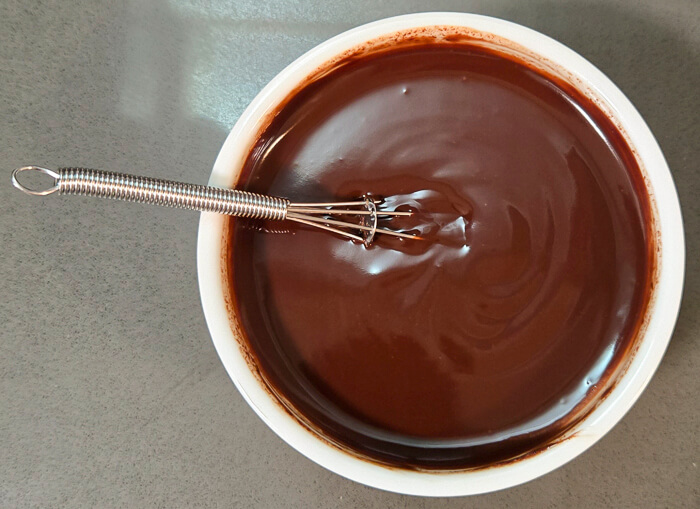
4.
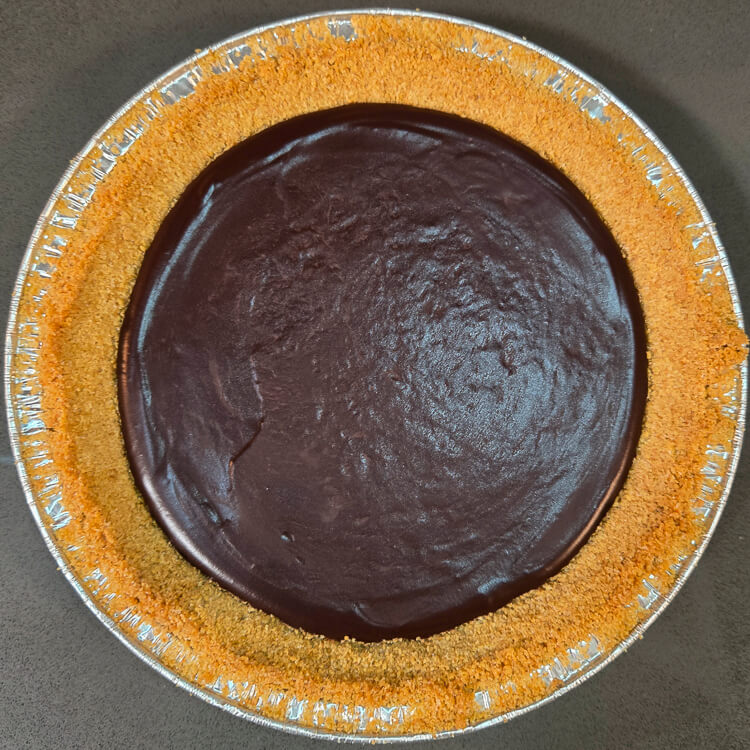
Pour the ganache into your prepared graham cracker crust. Give the pie tin a gentle jiggle to even everything out if you’d like.
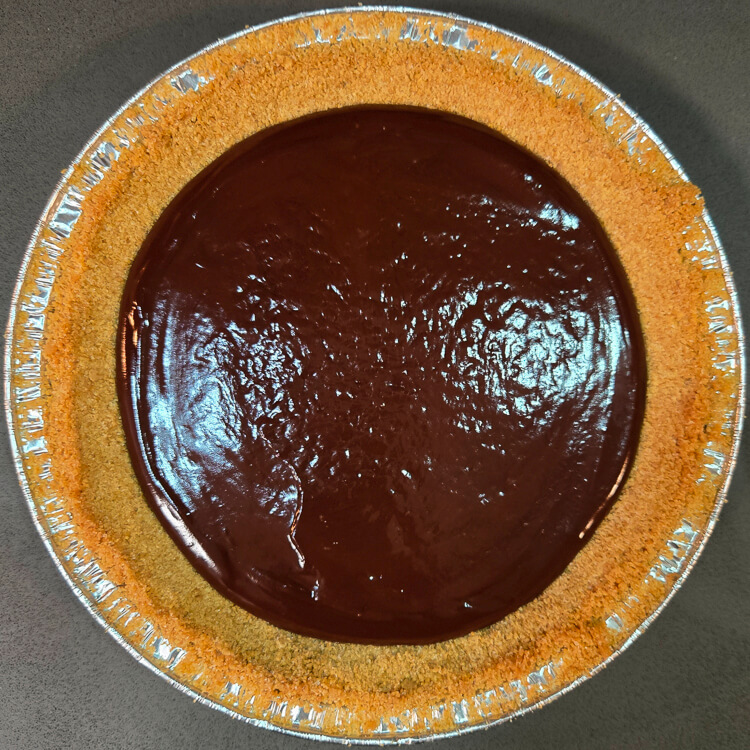
5.
Place the pie in the refrigerator for at least two hours to allow the chocolate ganache to set while you prepare the marshmallow topping.
Troubleshooting Chocolate Ganache
Sometimes chocolate ganache can seem tricky, but don’t worry! It’s usually pretty easy to rescue and you won’t have to waste your ingredients.
- Rescuing a Broken Ganache: Ganache can “break” if the cream is too hot when added, causing the emulsion to separate and leaving you with a grainy or oily texture. To fix it, whisk in 1–2 tablespoons of cold cream. This lowers the temperature and helps bring everything back together into a smooth, glossy ganache.
- Thinning a Ganache: If your ganache is too thick, gently warm it in a heatproof bowl over a double boiler until it softens, then whisk in additional cream a little at a time until it reaches the consistency you’re looking for.
- Thickening a Ganache: If your ganache is too thin, melt some additional chocolate in a heatproof bowl over a double boiler. If your ganache is cold, warm it the same way first. Once everything is melted and soft, whisk the additional chocolate into your ganache until fully incorporated.
Homemade Marshmallow Fluff for S’mores Pie
A s’more wouldn’t be complete without the toasted marshmallow! We’ll walk you through how to make homemade marshmallow fluff for this pie, but fair warning: it’s the most advanced technique in this recipe. If that sounds like too much, don’t worry! We’ll introduce a couple of simpler options at the bottom of this section too.
What is Marshmallow Fluff?
Did you know that original marshmallows were actually made with marsh-mallow plants? Today the confection is usually made from a mixture of whipped sugar, water, and gelatin. Marshmallow fluff is a little different. It’s usually a form of extra-stabilized Italian meringue, which makes it smoother and much easier to spread with a knife than a regular marshmallow. Marshmallow fluff was invented in the early 1900s, while marshmallows themselves have been around since Ancient Egyptian times!
What is Italian Meringue?
Meringue is simply egg whites whipped with sugar. When egg whites are whipped long enough, they form a stable foam that can be piped, spread, or folded into desserts to add lightness, like mousse and chiffon pies.
There are three main types of meringue: Swiss, French, and Italian. They’re all similar confections but the method for making each one differs a bit. Marshmallow fluff is a variation of Italian meringue, and it usually uses corn syrup (or invert sugar syrup if you want a homemade substitute) to stabilize it further and make it a little sweeter.
Italian meringue is generally considered the most technical and challenging of the three to make. The sugar is first heated with water to form a hot syrup, which is then cooked to the soft-ball stage at 235–245°F (115–118°C) and slowly streamed into the egg whites while they’re being whipped. The mixture is then whipped until it reaches stiff peaks. The payoff for all that effort is that Italian meringue is the most stable of the three types. It holds its shape the longest and is the least likely to weep over time, which is exactly what we want for marshmallow fluff.
To make this meringue you’ll need a stand mixer with a whisk attachment. The egg whites need to whip on high speed for 5 to 10 minutes to reach a stable meringue texture.
You can read my whole post on the science and troubleshooting of meringue here!
Homemade Marshmallow Fluff Recipe
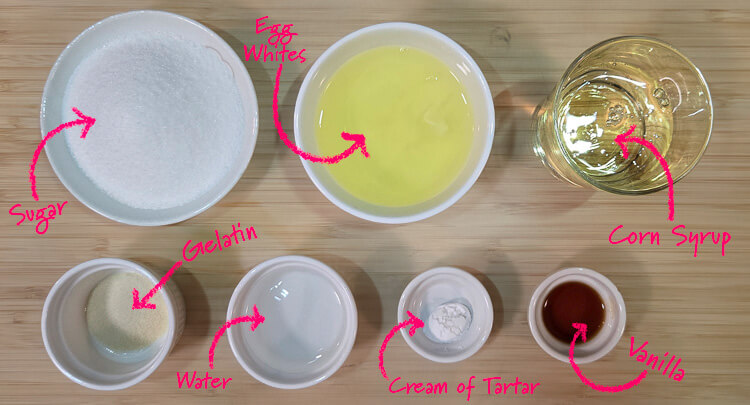
Ingredients
- 2 Egg Whites
- ¼c + 1T Water
- ½c Granulated Sugar (100g)
- ½c Corn Syrup (or invert sugar syrup)
- ¼t Cream of Tartar
- ½t Vanilla Extract
- 1t Unflavored Gelatin
1.
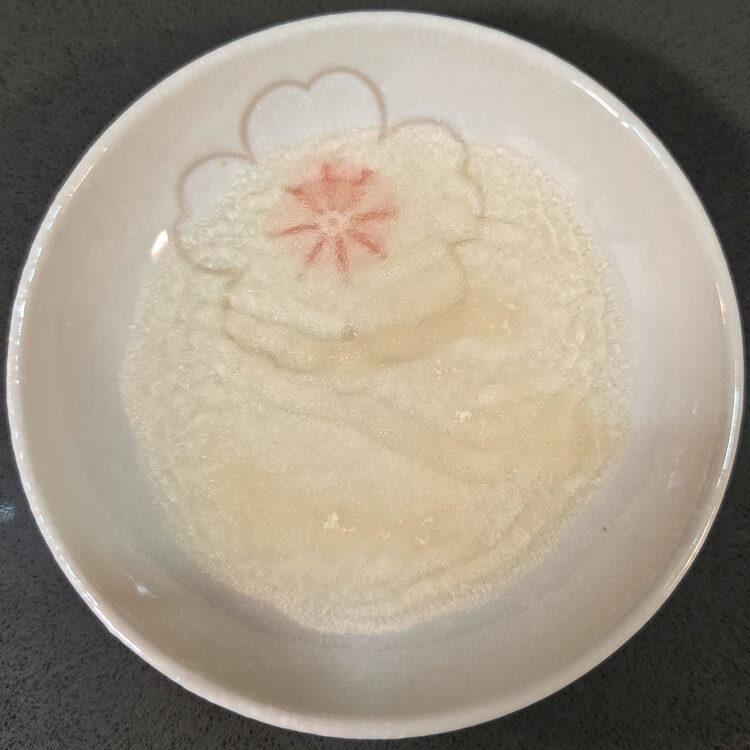
Sprinkle the unflavored gelatin over 1 tablespoon of water in a microwave-safe container and set it aside. This gives the gelatin time to bloom before we use it.
2.
In the bowl of your stand mixer, whip the egg whites and cream of tartar on high speed until they form a foam, then turn off the mixer.
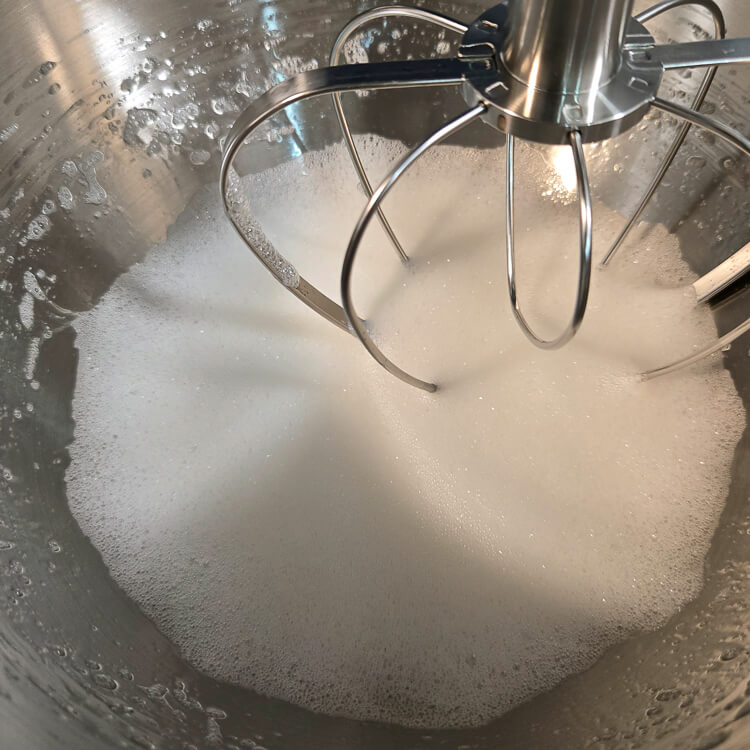
3.
In a small saucepan over medium-low heat, combine the water, corn syrup (or invert sugar syrup), and sugar. You don’t need to stir this mixture at all. In fact, stirring can accidentally trigger the dissolved sugar to crystallize, so just leave it alone!
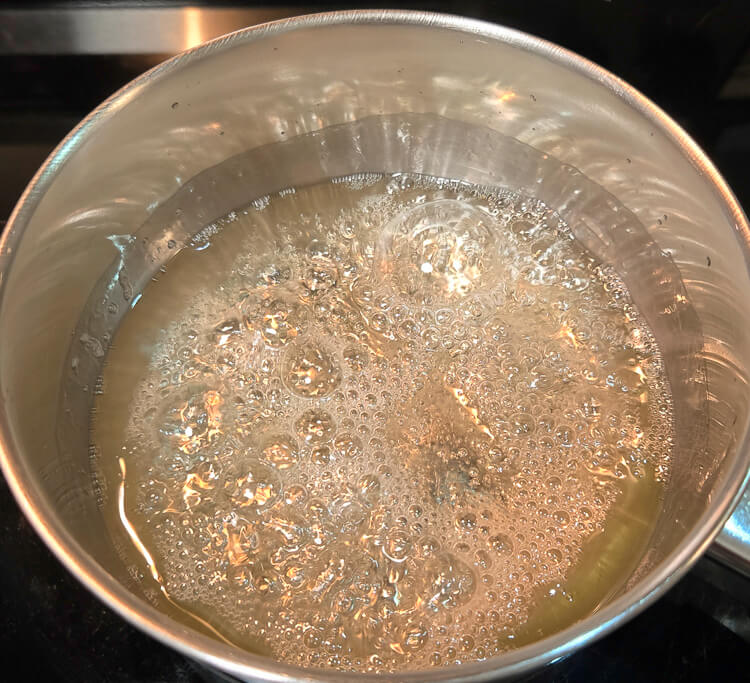
4.
Once the mixture begins to boil, check the temperature every few minutes with a thermometer. You’re waiting for the syrup to reach 235°F (115°C).
5.
As soon as the syrup hits 235°F (115°C), remove it from the heat and pour it into a Pyrex measuring cup. Don’t use a regular glass measuring cup or a plastic one unless you know it’s rated for temperatures as high as 235°F (115°C). Untempered glass may shatter and plastic may melt.
6.
Turn the stand mixer back on high and pour the hot sugar syrup in as slowly as you can while the mixer is still running. Pouring slowly is important here so you don’t accidentally cook the egg whites too fast and end up with scrambled eggs instead of meringue!
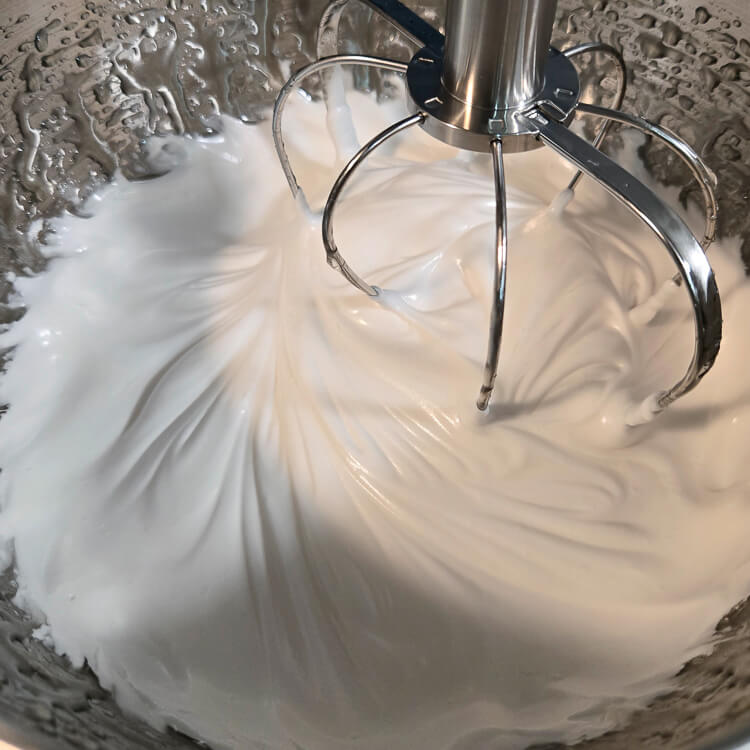
7.
Once all the syrup has been added, let the mixer keep whipping on high speed for another 7 minutes.
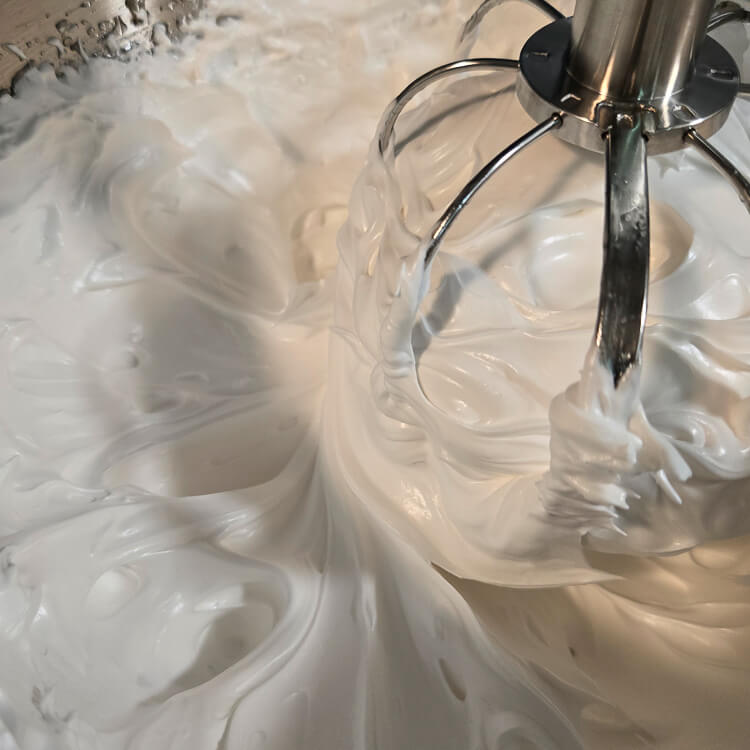
8.
Microwave the gelatin mixture from step 1 for 5 seconds or until the gelatin melts into the water.

9.
With the stand mixer running on high, pour the melted gelatin into the whipped meringue. Whip for another minute or two and you’re done. Your homemade marshmallow fluff is ready to use!
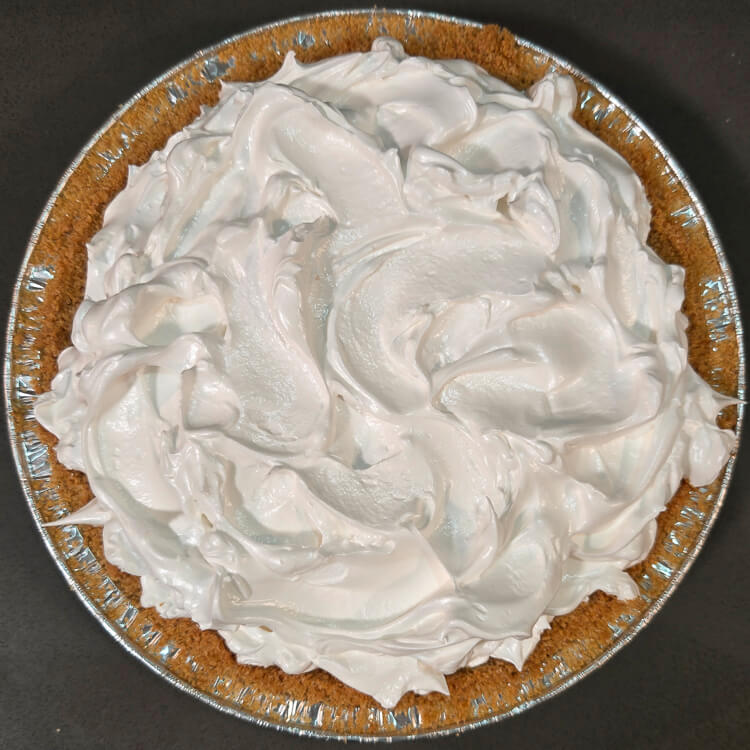
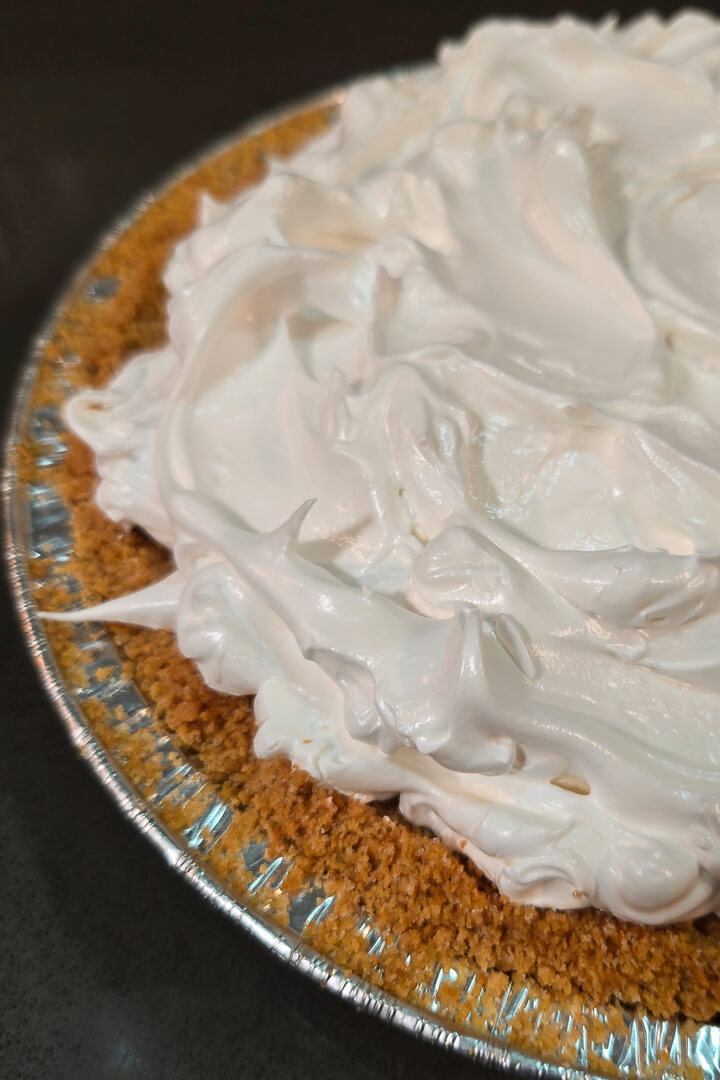
How to Top a S’mores Pie with Marshmallow Fluff
Now that you have your homemade marshmallow fluff ready to go, it’s time to top your s’mores pie! Pull your pie out of the refrigerator and pick whichever method works best for you.
- With a Spoon: Spoon the marshmallow fluff onto the chocolate ganache filling and use the back of the spoon to gently spread it until it reaches the edges of the crust.
- With an Offset Spatula: Offset spatulas are handy baking tools that make spreading fillings and frostings much easier. Spoon the fluff onto the pie and use the offset spatula to spread it evenly out to the edges.
- With Piping Tips: If you’re comfortable with piping bags and piping tips, marshmallow fluff can be piped onto the top of your pie in all kinds of fun designs!
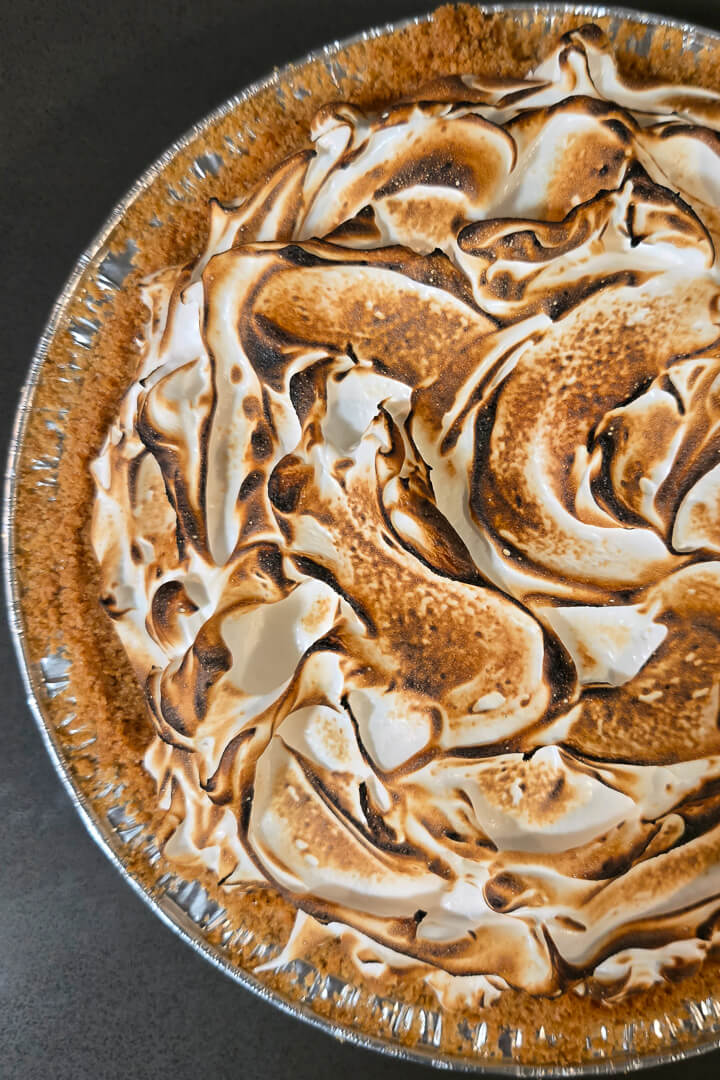
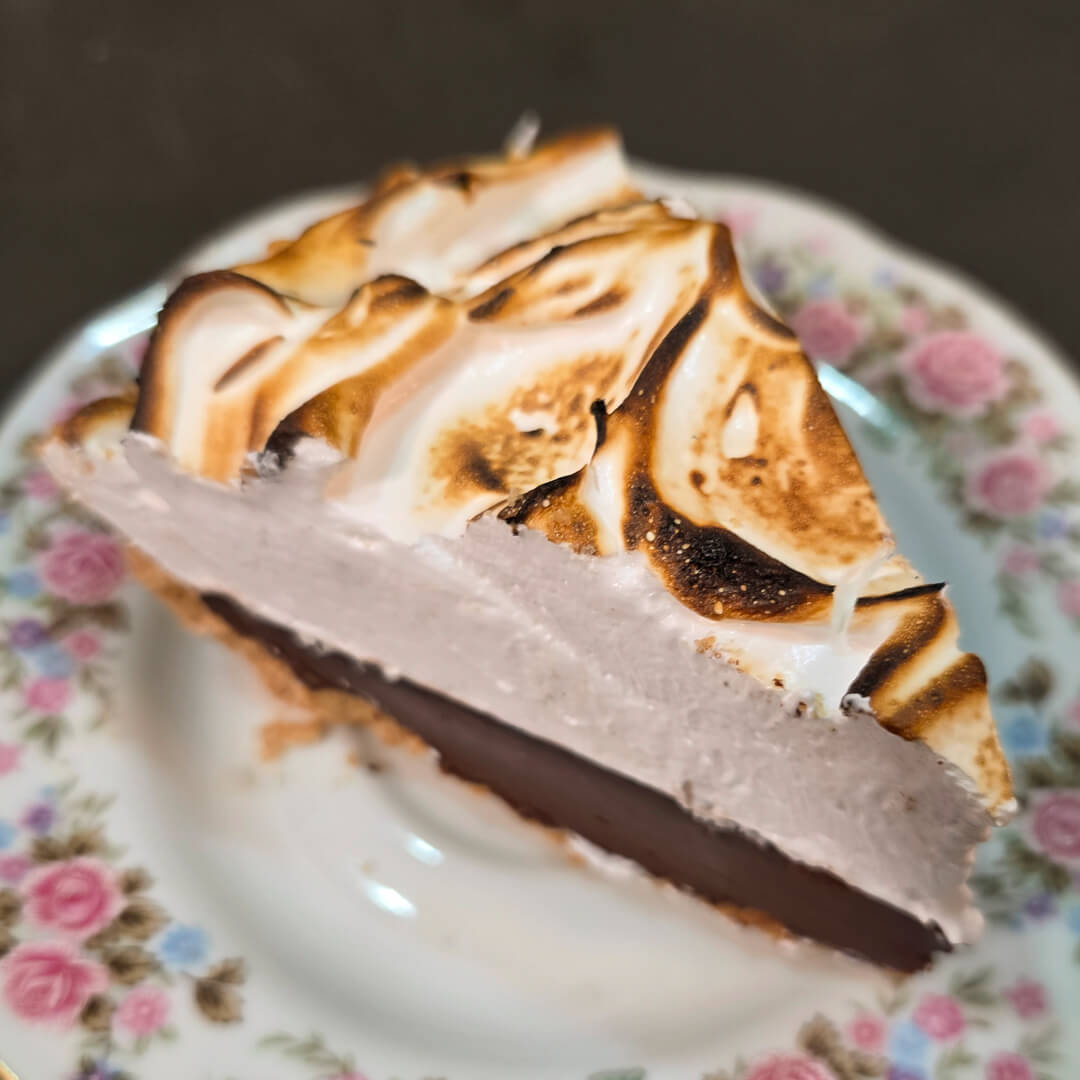
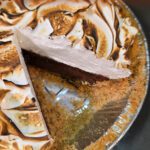
How to Toast the Marshmallow Topping on a S’mores Pie
Once you’ve got your marshmallow topping on your s’mores pie, it’s time to get it nice and toasty, just like a real s’more! There are a couple of ways to do this.
- With a Kitchen Torch: Kitchen torches are great for toasting meringues, bruleeing, and quickly searing meats. Just like you’d hold a marshmallow over a campfire, carefully toast the topping all over with the flame of the kitchen torch until it’s golden brown.
- With a Broiler: Most ovens have a broiler setting. A broiler uses intense, direct heat from the top of the oven at a very high temperature, usually around 500°F (260°C). It can toast the marshmallow topping on this pie quickly without getting the chocolate ganache underneath too melty.
Set your broiler to high and watch your pie the entire time. It only takes a minute or two and you (probably) don’t want a charred marshmallow topping! When I use the broiler to finish pies, I turn the oven light on and pull the pie out as soon as the topping starts to brown.
Using Store-Bought Marshmallows for S’mores Pie
The homemade marshmallow fluff is the most technically difficult part of this s’mores pie, but you absolutely don’t have to make it yourself! Here are a couple of easy store-bought options that work just as well.
- Store-Bought Marshmallow Fluff: Pick up a jar of marshmallow fluff from the grocery store and spread it right on top of your pie. Toast or broil it the same way you would the homemade version.
- Store-Bought Marshmallows: Arrange large marshmallows over the top of your pie and toast them just like you would at a campfire! Use a kitchen torch or broiler to get them perfectly golden.
Other Beginner Pie Recipes in the Pie School Series
I’m slowly building out a series of posts for beginner bakers that covers every single step, from the very basics all the way to baking up a complete pie. This s’mores pie is one of the recipes in the series, and I also have a post on a really easy chocolate cream pie. If you’re new to baking, or just looking for a fun project to do with your kids, these are great recipes to start with!

How to Store a S’mores Pie
Meringue doesn’t keep very long, and since marshmallow fluff is basically a form of meringue, the same rule applies here. This pie is at its best eaten the day it’s made. It can hang out in the refrigerator for about 1 to 3 days, but after that the marshmallow fluff will start to weep, which is when the air bubbles escape and liquid starts seeping out from the bottom.
We’d love to see your Pie School creations! If you give this recipe a try, tag @doggone_baking on social media so we can share in the baking fun.

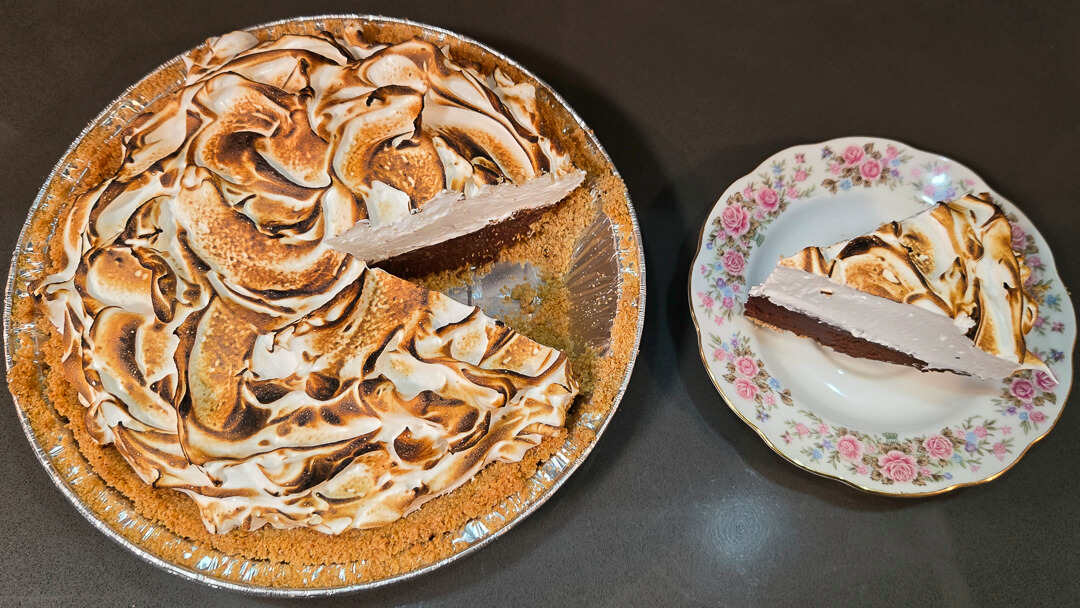
S’mores Pie
Ingredients
Graham Cracker Crust
- 1½ cups Graham Cracker Crumbs (~210g)
- ¼ cup Granulated Sugar (50g)
- ¼ cup Unsalted Butter, melted (2oz)
Chocolate Ganache
- 8 oz Semisweet Chocolate, chopped (227g)
- 1 cup Heavy Whipping Cream
Marshmallow Fluff
- 2 Egg Whites
- 5 tbsp Water (divided) (75mL)
- ½ cup Granulated Sugar (100g)
- ½ cup Corn Syrup (118mL)
- ¼ tsp Cream of Tartar optional
- ½ tsp Vanilla Extract
- 1 tbsp Unflavored Gelatin
Instructions
Make the Graham Cracker Crust
- Break graham crackers into pieces and grind into fine crumbs using a food processor. Work in small batches so you don’t overfill.
- Measure out 1½ cups of crumbs and place them in a medium mixing bowl.
- Add ¼ cup melted unsalted butter and ¼ cup granulated sugar to the crumbs.
- Mix with a fork until the crumbs are evenly coated and the texture resembles wet sand.
- Press the mixture firmly into the bottom and sides of a 9-inch pie pan. Start in the center and work outward. A flat-bottomed measuring cup or glass helps pack the crumbs tightly.
- For no-bake fillings, chill the crust in the refrigerator for at least 1 hour, or pre-bake at 350°F (175℃) for 5–7 minutes if you prefer a crispier crust. For baked pies, fill the crust and bake according to your recipe, no pre-baking required.
Make the Chocolate Ganache Filling
- In a small saucepan, warm heavy whipping cream until it just reaches a simmer. Avoid letting it come to a full boil, since cream that’s too hot can cause the ganache to break or become grainy.
- Pour the hot cream into the chopped chocolate, and whisk until fully combined into a smooth ganache.
- Pour the ganache into your prepared graham cracker crust.
- Place the pie in the refrigerator for at least two hours to allow the chocolate ganache to set while you prepare the marshmallow topping.
Make the Homemade Marshmallow Fluff
- Sprinkle the unflavored gelatin over 1 tablespoon of water in a microwave-safe container and set it aside.
- In the bowl of your stand mixer, whip the egg whites and cream of tartar on high speed until they form a foam, then turn off the mixer.
- In a small saucepan over medium-low heat, combine the remaining ¼ cup of water, corn syrup (or invert sugar syrup), and sugar. You don't need to stir this mixture at all.
- Once the mixture begins to boil, check the temperature every few minutes with a thermometer. As soon as the syrup hits 235°F (115°C), remove it from the heat and pour it into a Pyrex measuring cup.
- Turn the stand mixer back on high and pour the hot sugar syrup in as slowly as you can while the mixer is still running.
- Once all the syrup has been added, let the mixer keep whipping on high speed for another 7 minutes.
- Microwave the gelatin and water mixture for 5 seconds or until the gelatin melts into the water.
- With the stand mixer running on high, pour the melted gelatin into the whipped meringue. Whip for another minute or two and you're done.
- Remove the graham cracker crust filled with chocolate ganache from the refrigerator. Spread the marshmallow fluff over the top using the back of a spoon, an offset spatula, or piping tips.
- Using a kitchen torch, brown the marshmallow fluff until it is a golden brown. Alternatively, put the pie under a broiler until the marshmallow fluff becomes a golden brown color.
- Slice and serve!

About Me
In 2016, I left my office job and became a professional baker. These days I spend my days testing recipes and baking pies while my two dogs snooze happily nearby.
See My Full Bio
One response to “Easy S’mores Pie Recipe | Pie School Series”
-

Absolutely delicious! It’s the easier way to eat a S’more lol


Leave a Reply