This post may contain affiliate links. Please read my disclosure policy.
All recipes on Doggone Baking are intended for humans — the dogs are just our enthusiastic photo assistants and taste-test spectators.

Hawaiian Chocolate Haupia Pie Recipe
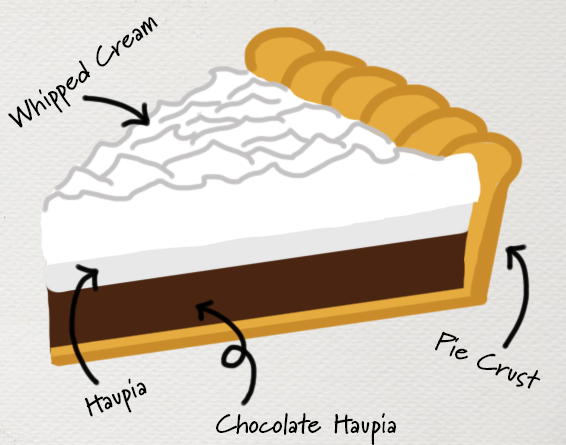
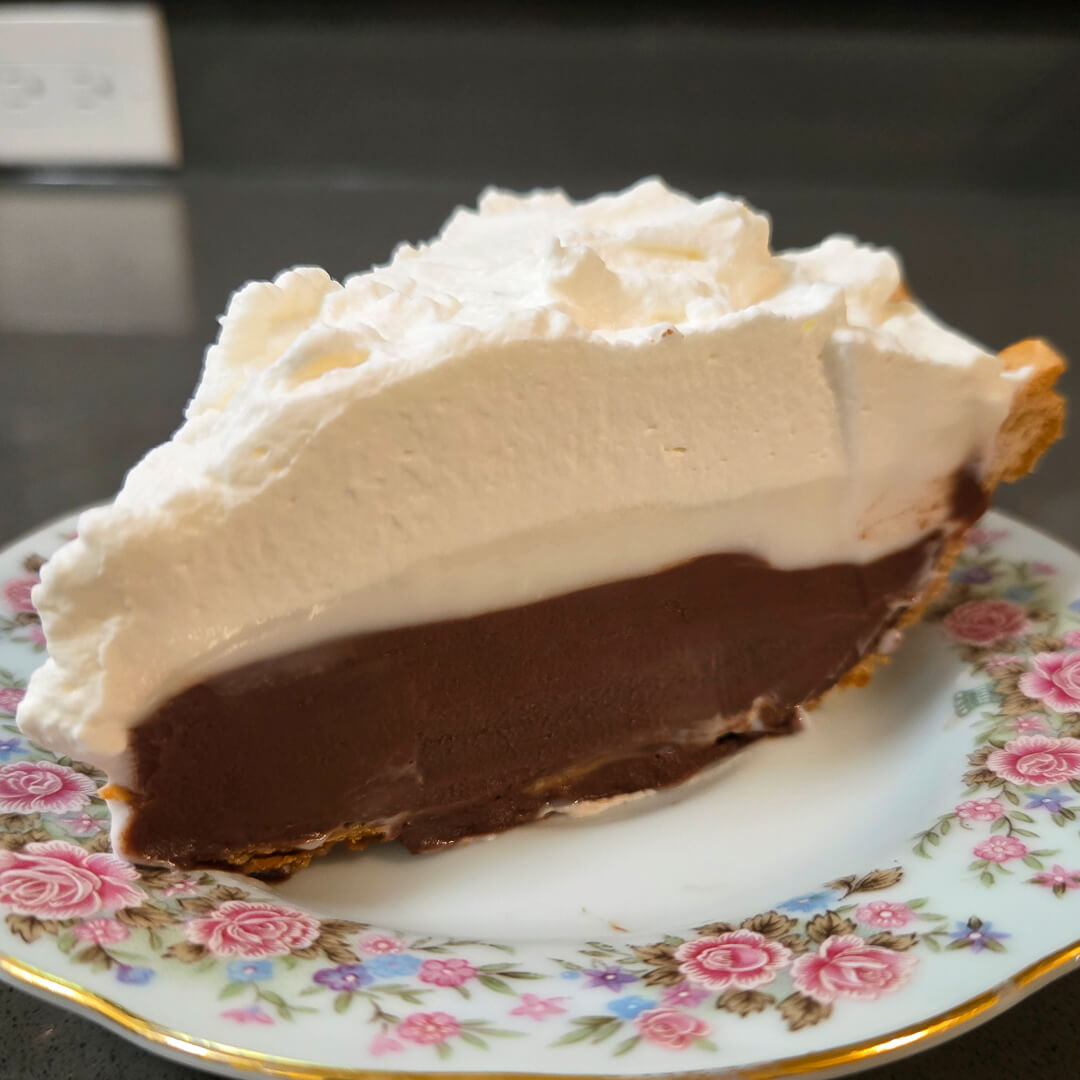
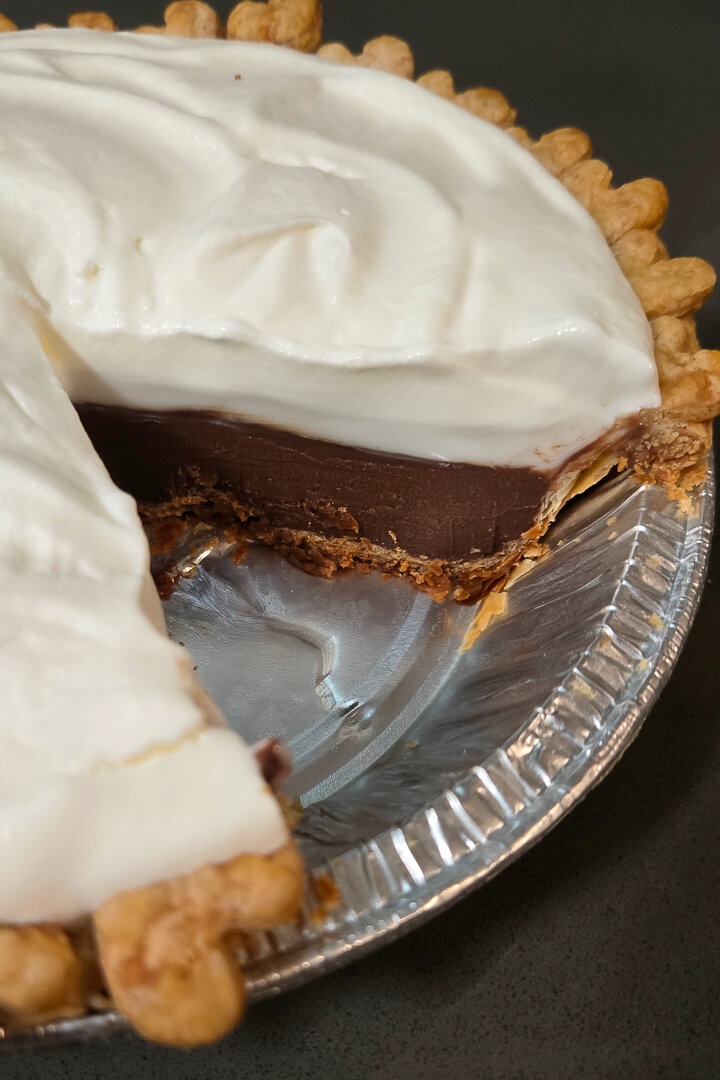
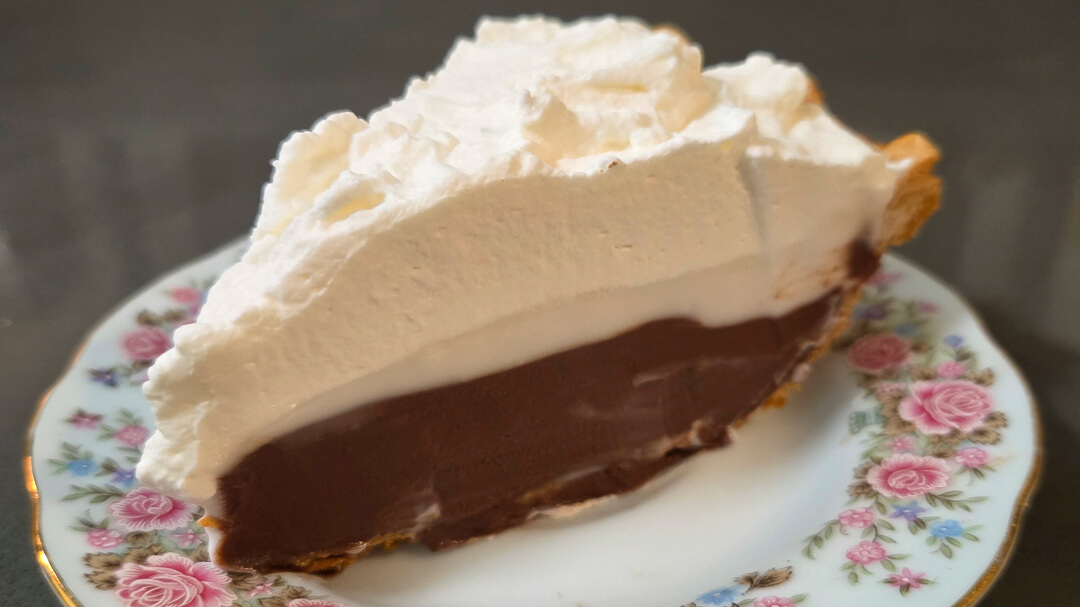
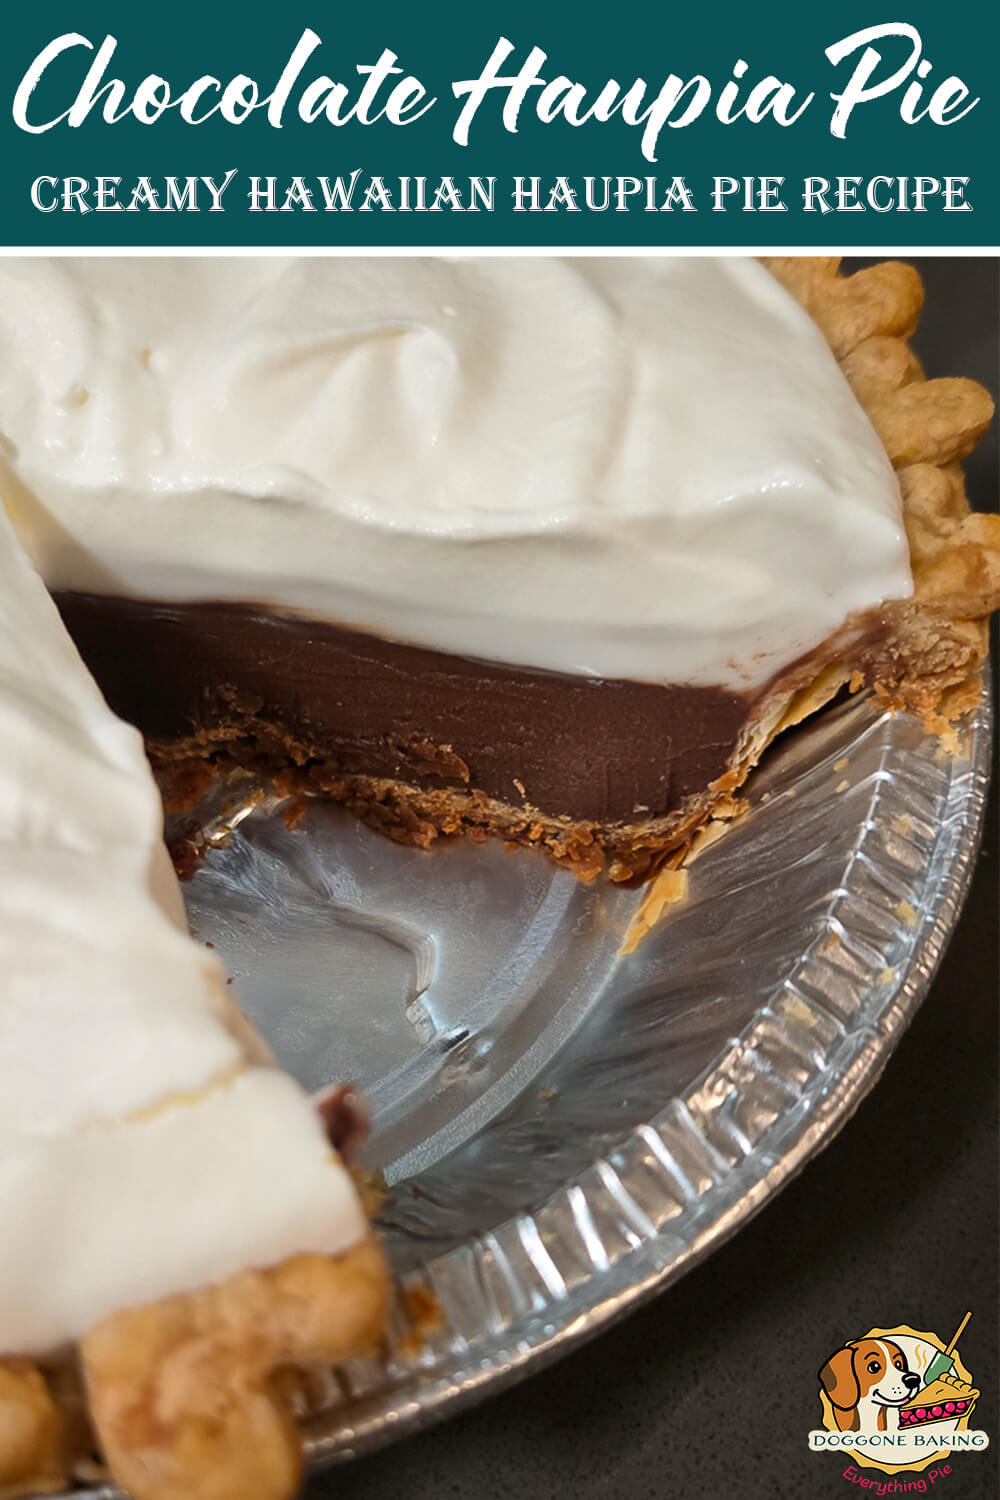
Chocolate haupia pie is a Hawaiian dessert made famous by Ted’s Bakery on the North Shore of Oahu. It takes classic Hawaiian haupia and turns it into a pie by layering chocolate haupia and regular coconut haupia in a pastry crust, then finishing it with whipped cream. With this chocolate haupia pie recipe you can try this delicious, coconut-milk based Hawaiian dessert at home even if you aren’t in Hawaii.

What is Chocolate Haupia Pie?
Haupia is a simple, traditional Hawaiian dessert made with coconut milk, sugar, and a thickener like arrowroot or cornstarch. The chocolate haupia pie popularized by Ted’s Bakery builds on that base by using a pastry crust filled with two layers: chocolate haupia on the bottom and classic coconut haupia on top. Many modern recipes add a small amount of dairy milk to create a softer, creamier haupia pie filling than the firmer, traditional version.

The History of Haupia
Haupia (pronounced how-PEE-uh) is a traditional Hawaiian dessert sometimes referred to as coconut pudding. It is made with coconut milk, sugar, and a starch thickener. Traditionally, arrowroot starch was used, although cornstarch has become the more common option in modern recipes. Haupia sets more firmly than a typical pudding, which is why it is often served chilled, sliced into squares, and eaten as a finger dessert.
Haupia is part of Polynesian Indigenous cooking and can be traced back to at least the 1940s. In the Hawaiian language, hau means “cool” and pia means “arrowroot.” Although haupia is often thickened with cornstarch today, the original recipes used arrowroot powder as the thickener.
Haupia can be found throughout Hawaii. It’s often sold at bakeries, markets, and served at luaus and is sometimes on the dessert menu at restaurants. It’s often served on its own, or you can find it in pies (like this recipe), or in other sweet items like pastries, mochi desserts, cakes, and ice cream.
Ted’s Bakery opened in 1988 inside Ted’s father’s grocery store on the North Shore of Oahu. According to an interview with Ted, the bakery began selling its first pies in 1990, and those early offerings included the haupia pies that later became famous across Hawaii. By 1996, they had expanded into wholesale production, and haupia pies from Ted’s began appearing in stores throughout Hawaii. Their website provides additional background on the bakery’s early years and growth.
Today, Ted’s Bakery is still recognized for its chocolate haupia pie, and it continues to be one of their most popular desserts. They won Hawaii’s Best Pie of 2025, and they regularly release seasonal variations, such as pumpkin haupia pie made with a pumpkin base and a classic haupia layer on top. Their Instagram is the easiest way to follow new flavors and other updates from the bakery.
Where to Get Chocolate Haupia Pie
Chocolate haupia pie became widely known through Ted’s Bakery on Oahu in Hawaii. The bakery is located on the North Shore of the island, about a one hour drive from Honolulu, and remains a popular stop for locals and visitors. Ted’s Bakery pies are also sold in many grocery stores throughout Oahu and across the other Hawaiian islands, including in major chains such as Foodland and Safeway.
Because haupia pie has become a well loved local dessert, many bakeries and markets throughout Hawaii now offer their own versions, so it is usually easy to find a slice no matter where you are in Hawaii. If you want help tracking down specific locations, hawaii-guide.com provides a helpful list of places known for serving or selling haupia pie.
Note: This information was last updated in November 2025.
Step-by-Step Chocolate Haupia Pie Recipe:
Crust:
Chocolate haupia pie is often sold in a flaky pie crust. To make this pie in a flaky pie crust, you’ll want a fully baked pie shell. This chocolate haupia pie works great in a crumb crust as well. If a flaky pie crust feels like more effort than you want, a graham cracker crust is an easy alternative that still complements the coconut and chocolate flavors. For a vegan version, an Oreo crust is a great option since it pairs naturally with the chocolate and coconut filling and requires no dairy ingredients.

Chocolate Haupia Pie Filling:
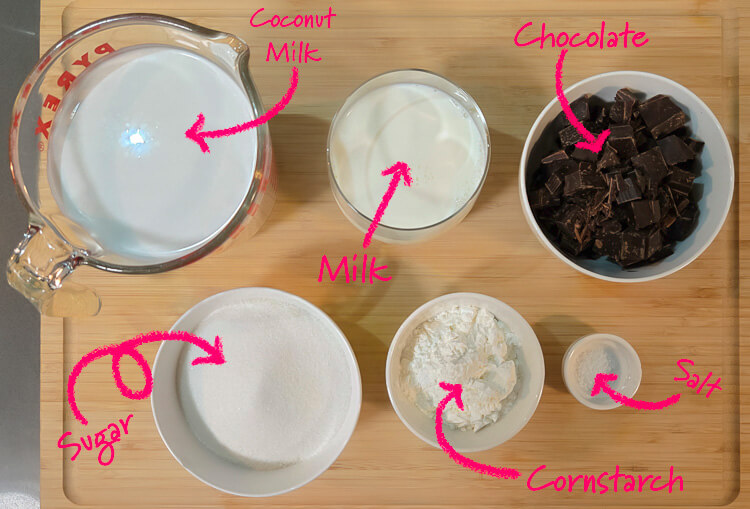
Ingredients
- 2¼c Full-Fat Coconut Milk (535mL)
- 1c Whole Milk (237mL)
- 6T Cornstarch (48g)
- ⅞c Sugar (175g)
- ¼t Salt
- 5oz Chopped Chocolate, dark or semisweet (140g)
1.
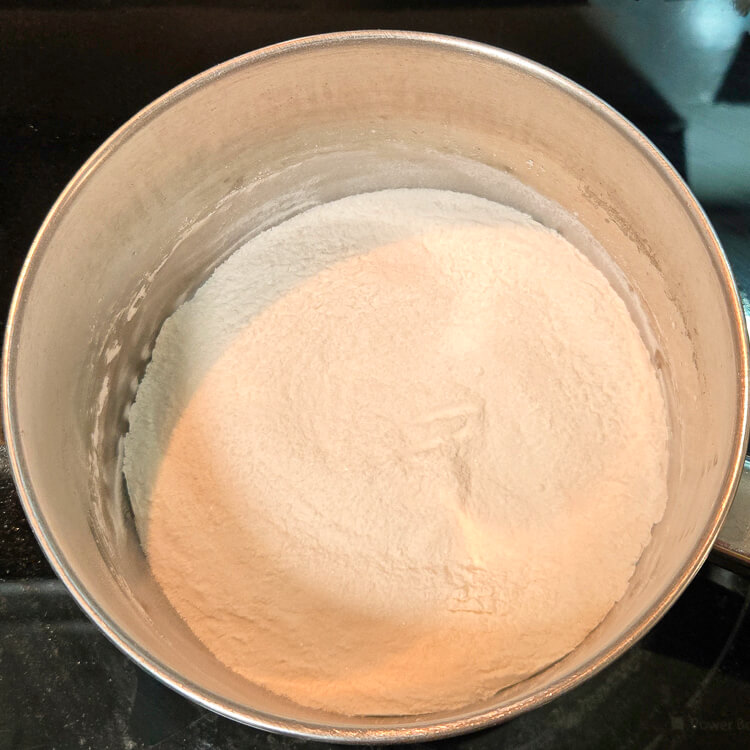
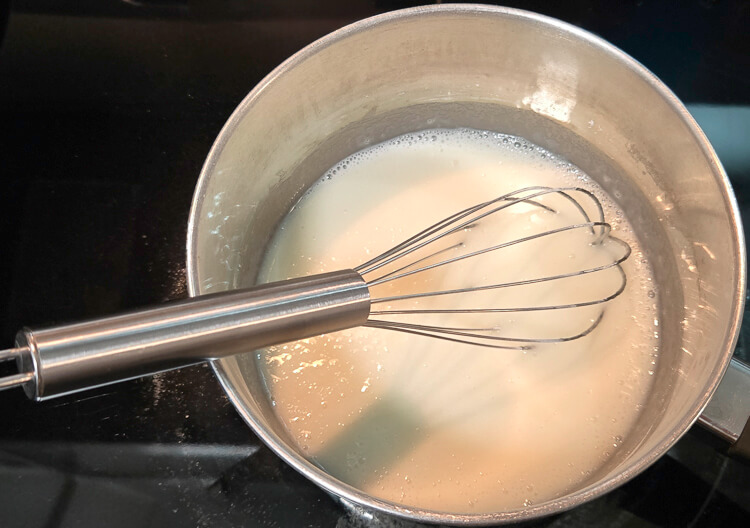
In a medium pot that holds at least 4 quarts, whisk together the cornstarch, sugar, and salt. This step helps separate and break up any clumps of cornstarch.
2.
Add about half of the milk and whisk until the mixture is smooth. This helps the cornstarch dissolve evenly before the remaining liquid is added.
3.
Add the rest of the milk along with the coconut milk, then whisk everything together thoroughly. If you notice any lumps, strain the mixture through a fine mesh strainer to create a smooth base.
4.
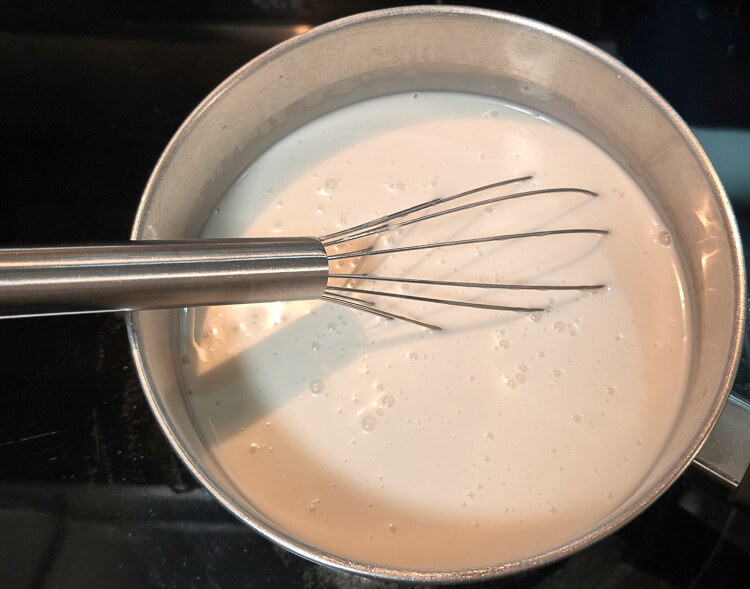
Place the pot over low heat and whisk constantly while the mixture cooks. Continue whisking until the haupia thickens and reaches a thick, pudding-like consistency. This process usually takes 15 to 20 minutes and is essential for helping the pie set properly.
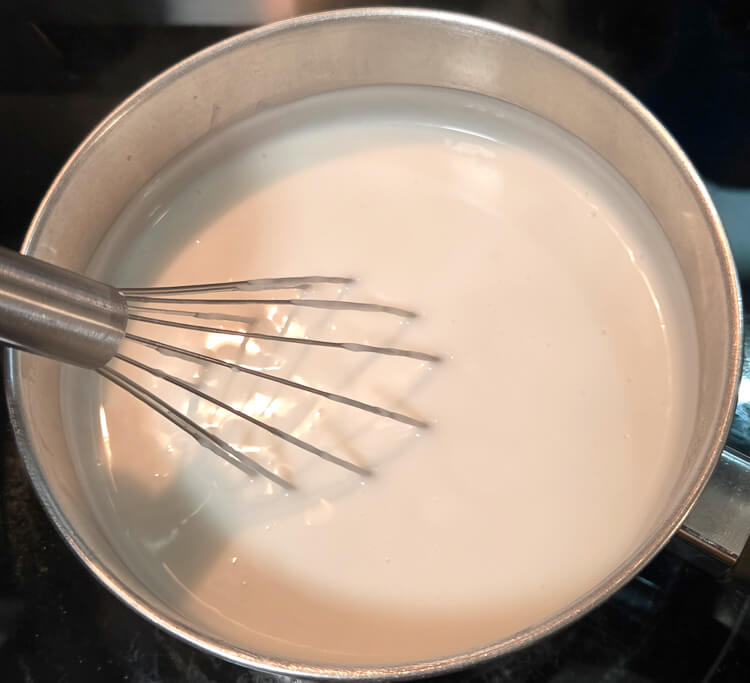
Note: Constant whisking prevents scorching.
5.
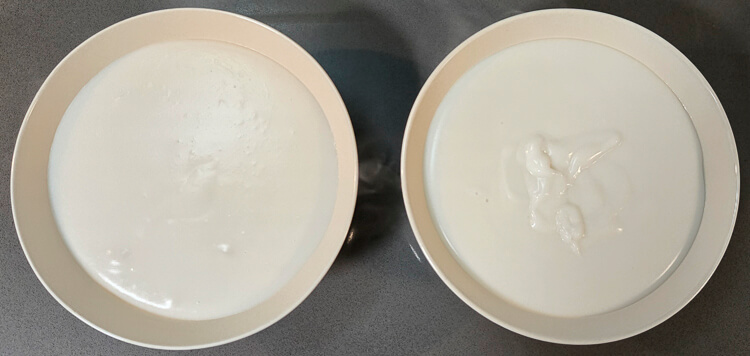
Remove the pot from the heat and divide the hot haupia evenly into two bowls, with about 2 cups in each.
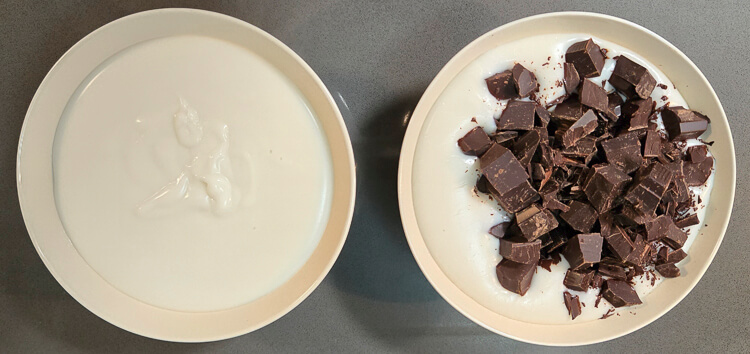
6.
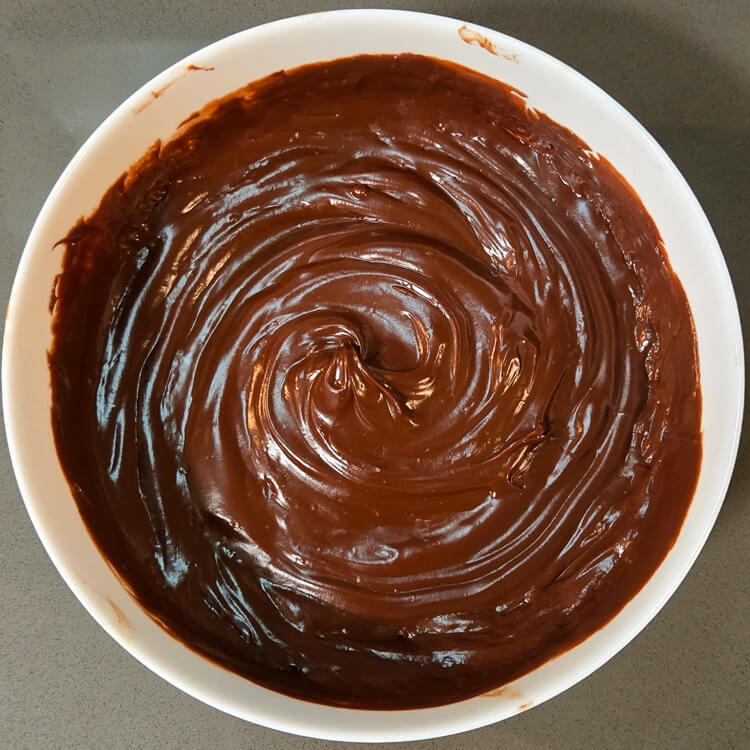
In one of the bowls, whisk the chopped chocolate into the hot haupia until the chocolate melts completely and the mixture is smooth.
7.
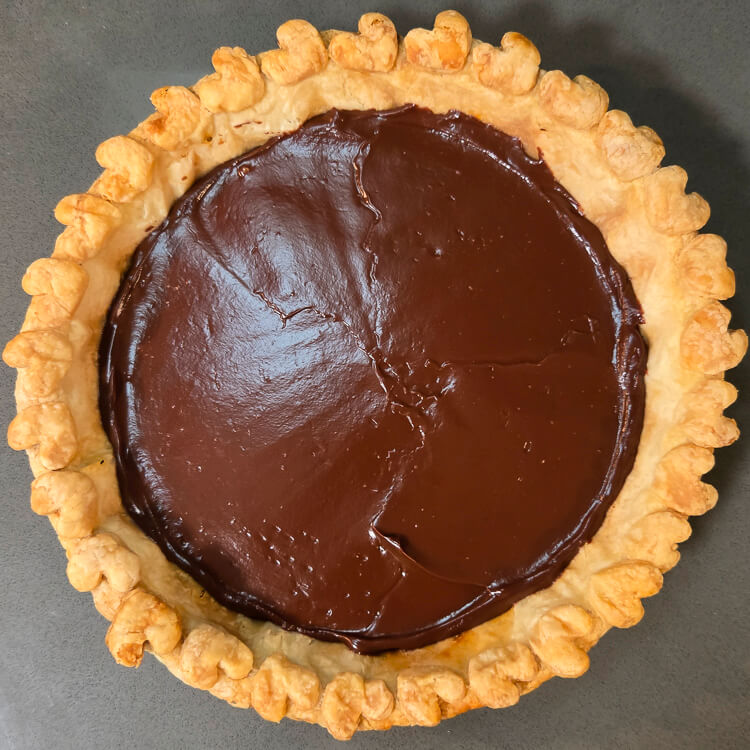
Pour the chocolate haupia into your prepared pie shell and spread it evenly with an offset spatula or the back of a spoon.
8.
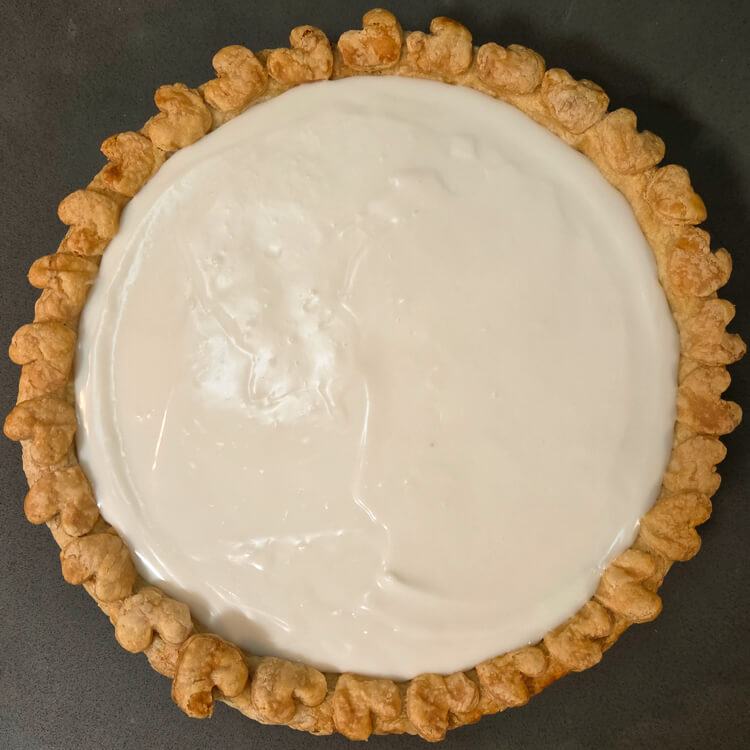
Carefully pour the remaining plain haupia over the chocolate layer. Gently spread the top layer until it is even and smooth using an offset spatula or spoon.
9.
Press a piece of plastic wrap directly onto the surface of the haupia to prevent a skin from forming as it cools.
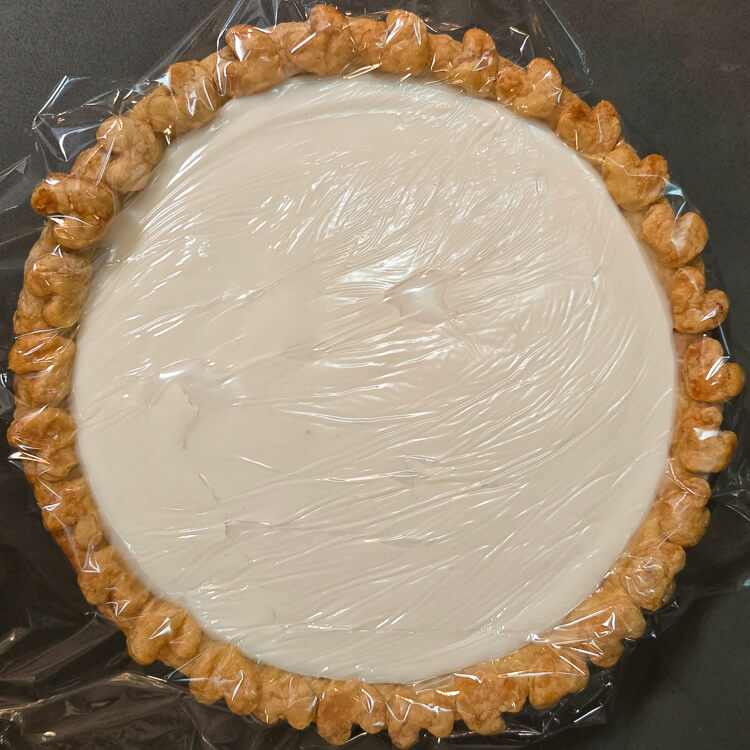
10.
Chill the pie in the refrigerator for at least 3 hours or overnight so the layers can firm up and fully set.
Whipped Cream Topping:
Ingredients
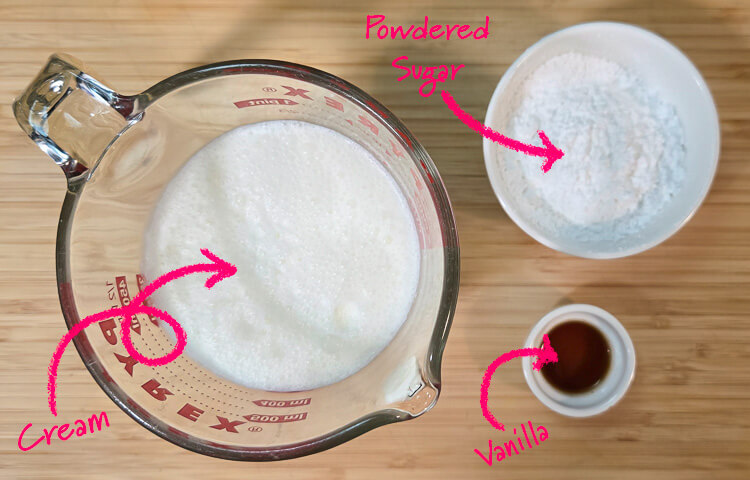
- 1½ c Heavy Whipping Cream, cold
- ¼c Powdered Sugar, sifted (60g)
- ½t Vanilla Extract
1.
In a stand mixer fitted with the whisk attachment, combine the cold heavy cream, sifted powdered sugar, and vanilla extract. Whip on medium-high speed until stiff peaks form and the cream holds its shape.
2.
Spread the whipped cream evenly over the chilled haupia filling using an offset spatula or the back of a spoon. For a more decorative look, transfer it to a piping bag and pipe rosettes or swirls across the top.
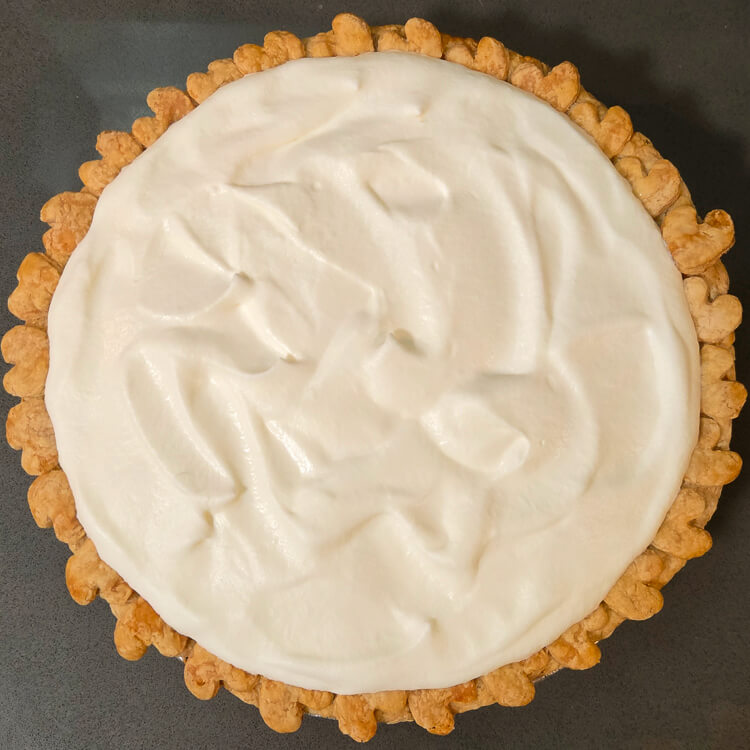
Pro-Tip: Sifting your powdered sugar is an important step to prevent clumps in your whipped cream. You can shake the powdered sugar through a fine-mesh sieve to sift it.
Vegan Haupia Pie:
Haupia is naturally a vegan dessert. Traditional haupia uses only coconut milk or coconut cream, arrowroot starch or cornstarch, and white sugar. Many modern haupia pie recipes add dairy milk to make the filling creamier, and most versions are topped with whipped cream, but it takes only a few simple adjustments to make this pie completely vegan.
If you want a vegan alternative to a classic chocolate cream pie, this chocolate haupia pie works extremely well. The texture is smooth and custard-like, and the coconut base creates a rich filling without any dairy.
To make this recipe vegan, replace the dairy milk with additional coconut milk and choose a dark chocolate that does not contain milk ingredients. Many chocolates above 63% cacao contain no dairy, although it is always best to check the label before purchasing.
The pie tastes delicious without any topping, and I often serve it plain when making it at home. If you prefer a whipped topping, whipped coconut cream pairs naturally with this recipe since the filling is already coconut based.
For the crust, you can prepare a flaky pastry crust using plant-based butter, or choose a vegan Oreo crust for a simple and reliable option.
Haupia Pie Variations:
Although chocolate haupia pie is the best known version, there are several other variations of haupia pie.
- Okinawan Sweet Potato Haupia Pie: This version features a vibrant purple base layer made from Okinawan sweet potatoes. The base is similar to an unspiced sweet potato pie, but because purple sweet potatoes are used, the filling takes on a naturally bold purple color. The pie is then topped with a layer of classic haupia and sometimes finished with whipped cream for extra richness.
- Pumpkin Haupia Pie: During the fall, Ted’s Bakery sells a seasonal pumpkin haupia pie. This version replaces the bottom chocolate layer with a smooth pumpkin pie filling, which creates a Hawaiian twist on traditional pumpkin pie while keeping the haupia layer on top.
- Crust Variations: Haupia pie works well in many types of crusts. If a flaky pie crust feels challenging or time consuming, the pie turns out equally well in a simple crumb crust. A graham cracker crust or an Oreo crust both pair naturally with the coconut filling and offer easy, reliable alternatives.

How to Store Chocolate Haupia Pie:
Haupia is traditionally served cold, and this pie is also best enjoyed fully chilled. The word hau even means “chilled” in Hawaiian. Store the finished pie in the refrigerator for three to five days. If you want to keep it longer, freeze the pie without the whipped cream topping.
When freezing, let the pie thaw in the refrigerator before serving, then add fresh whipped cream. Whipped cream does not freeze well and will separate once thawed, so it should always be added after the pie has defrosted. Keep in mind that while haupia can be frozen, the texture may change slightly after thawing and can become a bit chewier than when freshly made.
We’d love to see your chocolate haupia pie creations! If you give this recipe a try, tag @doggone_baking on social media so we can share in the baking fun.

Chocolate Haupia Pie
Ingredients
Crust
Haupia Pie Filling
- 2¼ cup Full-Fat Coconut Milk (535mL)
- 1 cup Whole Milk (237mL)
- 6 tbsp Cornstarch (48g)
- ⅞ cup Granulated Sugar (175g) ¾ cup + 2 tbsp
- ¼ tsp Salt
- 5 oz Chocolate, chopped (140g) Semisweet or Dark
Whipped Cream
- 1½ cup Heavy Whipping Cream (355mL)
- ¼ cup Powdered Sugar, sifted (60g)
- ½ tsp Vanilla Extract
Instructions
Make the Haupia Filling
- In a 4 quart pot, whisk together the cornstarch, sugar, and salt.
- Add ½ cup of the milk and whisk until smooth.
- Add the rest of the milk along with the coconut milk, then whisk everything together thoroughly. If you notice any lumps, strain the mixture through a fine mesh strainer to create a smooth base.
- Place the pot over low heat and whisk constantly while the mixture cooks. Continue whisking until the haupia thickens and reaches a thick, pudding-like consistency. This process usually takes 15 to 20 minutes and is essential for helping the pie set properly.
- Remove the pot from the heat and divide the haupia evenly into two bowls, about 2 cups each.
- In one of the bowls, whisk the chopped chocolate into the hot haupia until the chocolate melts completely and the mixture is smooth.
- Pour the chocolate haupia into your prepared pie shell and spread it evenly with an offset spatula or the back of a spoon.
- Carefully pour the remaining plain haupia over the chocolate layer. Gently spread the top layer until it is even and smooth using an offset spatula or spoon.
- Press a piece of plastic wrap directly onto the surface of the haupia to prevent a skin from forming as it cools.
- Chill the pie in the refrigerator for at least 3 hours or overnight so the filling fully sets.
Make the Whipped Cream
- In a stand mixer fitted with the whisk attachment, combine the cold heavy cream, sifted powdered sugar, and vanilla extract. Whip on medium-high speed until stiff peaks form and the cream holds its shape.
- Spread the whipped cream evenly over the chilled haupia filling using an offset spatula or the back of a spoon. For a more decorative look, transfer it to a piping bag and pipe rosettes or swirls across the top.

About Me
In 2016, I left my office job and became a professional baker. These days I spend my days testing recipes and baking pies while my two dogs snooze happily nearby.
