

This post may contain affiliate links. Please read my disclosure policy.
All recipes on Doggone Baking are intended for humans — the dogs are just our enthusiastic photo assistants and taste-test spectators.
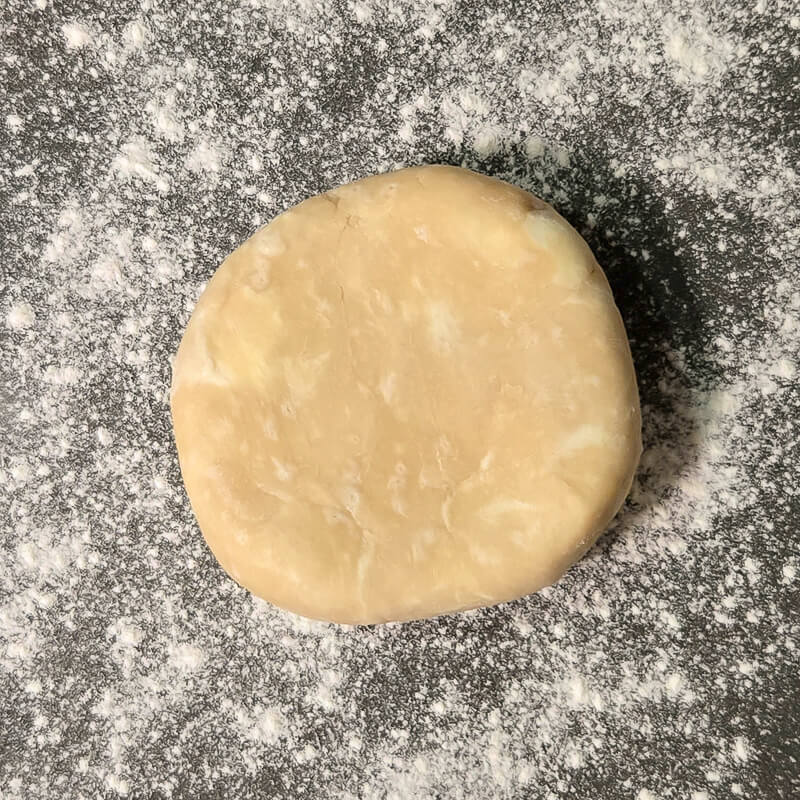
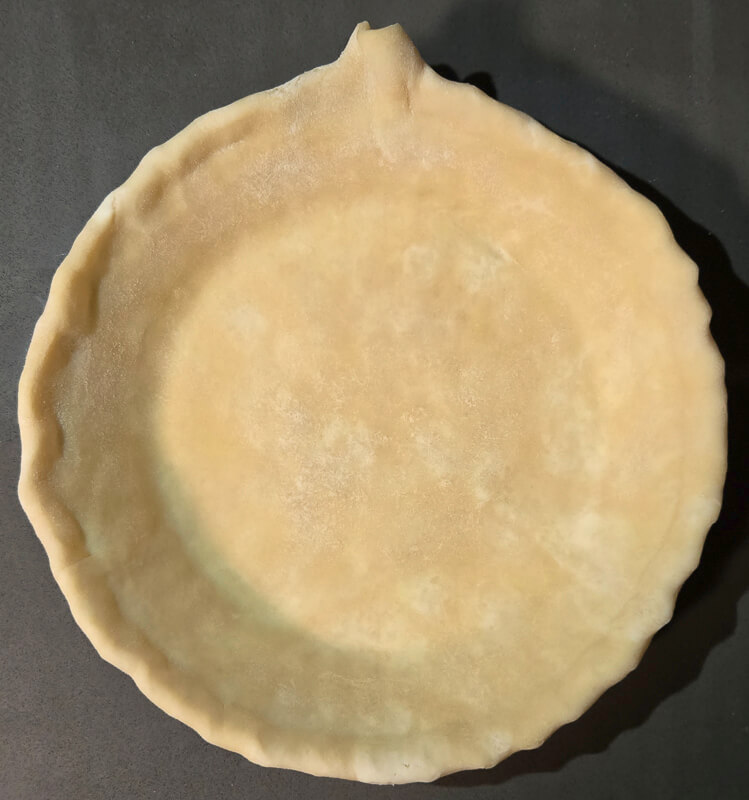
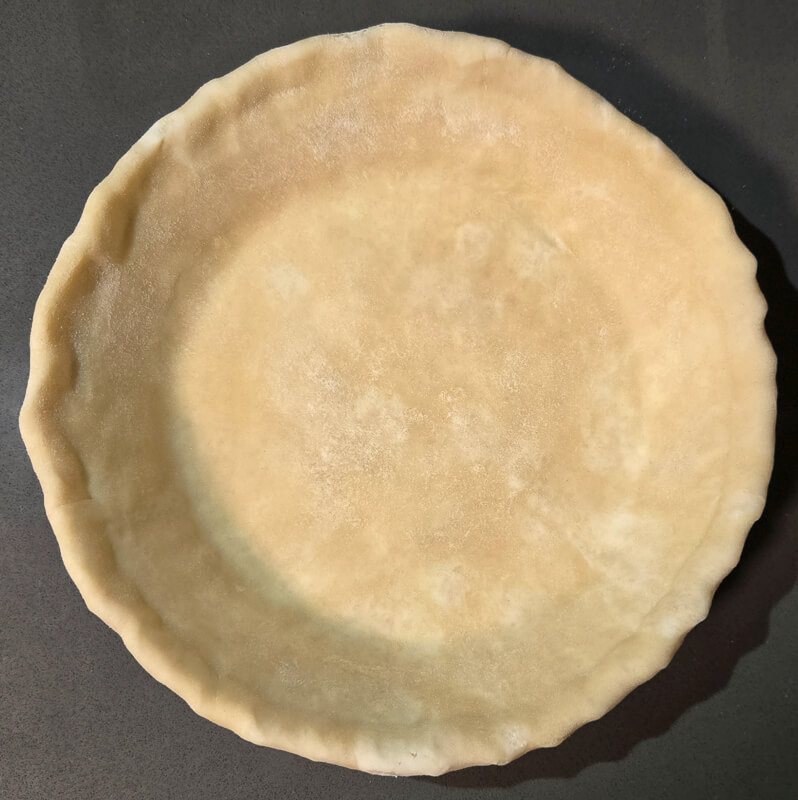
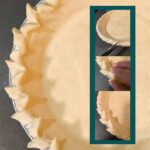
So you’ve made your pie dough, and now you have to transform that cold disc into a beautiful pie crust. For many bakers (myself included), this step is the hardest part to learn. This guide will walk you through how to form a pie crust and various techniques for pie crust designs – from extra simple to very fancy.
Tip: For best results, freeze your pie crust after forming and before baking!
To roll out pie dough thinly and evenly, a few key tools are necessary. You probably have most of them in your kitchen already.
Depending on the pie crust design you choose later (like a braided pie crust or decorative cut-outs) you may also need extra tools like a 5-wheel pastry cutter, cookie cutters, and a pastry brush.
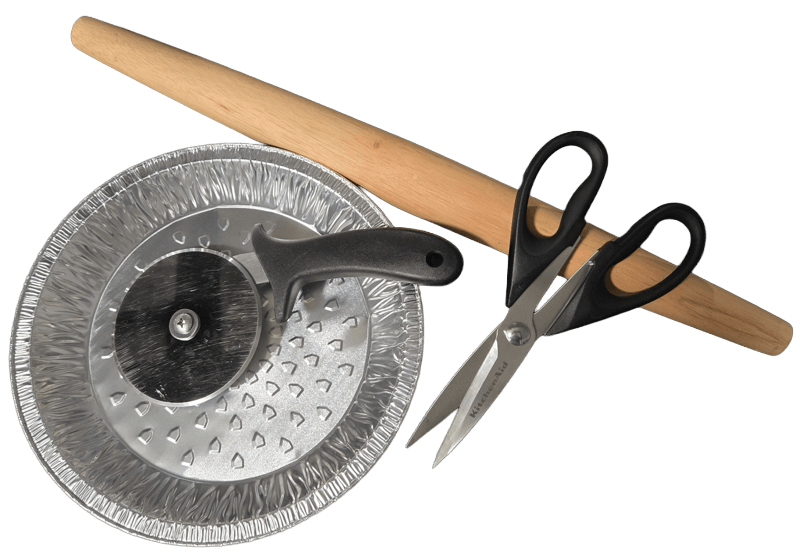
You can’t make pie without pie tins (unless you’re making turnovers, pasties, or another kind of hand pie). Pie tins come in two main types: reusable pans and disposable tins, and a few standard sizes. In the US, a 9” pie tin is the most common, but you’ll also find 10” and 6” tins for larger or smaller pies.
While I usually prefer reusable kitchen tools, pie tins are one place I often choose disposable. The ridges and texture on the sides of a disposable metal tin help the pie crust stay in place without slumping as it bakes. Reusable tins work well too, but if you do go that route, metal pie pans perform the best. Ceramic and glass pie pans look pretty, but they don’t conduct heat as evenly and also take longer to heat up, which can lead to a soggy or unevenly baked pie bottom.
A good rolling pin is essential for rolling out pie dough, especially since pie dough is easiest to work with when it’s still cold. Firm butter means a flakier pie crust, but it also makes the dough less pliable. You need a reliable rolling pin to get the pie dough thin and even without overworking it or taking so long the butter softens and sticks to your work surface.
There are several different types of rolling pins to choose from:


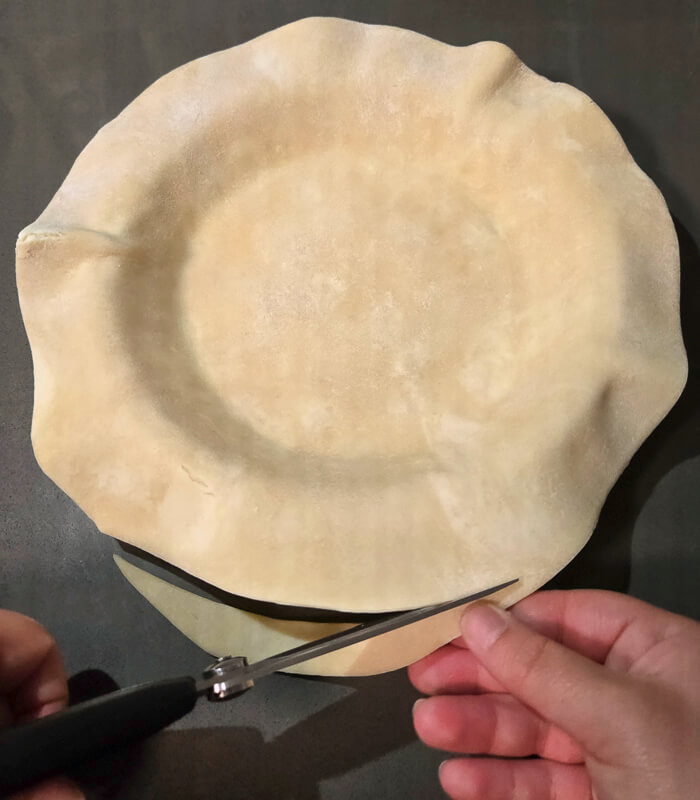
Not even the best pastry chefs roll out a perfect circle of dough every time. (And most professional kitchens use giant industrial machines called sheeters anyway). A pastry wheel (or a simple pizza cutter) is the easiest way to clean up your edges.
After rolling out your pie dough into a rough circle, you can use a pastry wheel to trim the edges into an even round shape. This makes transferring the dough easier and ensures a near, professional-looking pie crust.
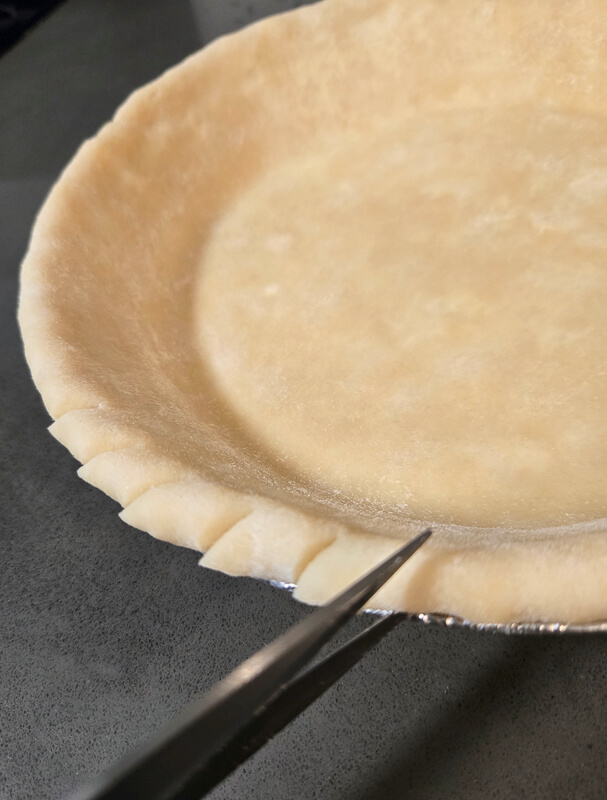
Kitchen scissors are very handy for minor adjustments of your pie crust. After pressing your dough into the pie tin, use scissors to make small adjustments for a clean, even edge. They’re especially handy for beginner methods like the simple press-and-trim technique.
Finally, you’ll need a large, flat work surface for rolling out pie dough. Most countertops work just fine – I use both my granite and stainless steel countertops at home, depending on which has more space. The most important factor is choosing a surface that you don’t mind dusting generously in flour.
If you’d rather not roll dough directly on your countertop, you can use a silicone non-slip rolling mat. These work, but they sometimes slide around and can be more hassle than they’re worth.
1.
Prepare Your Work Surface
Rolling out pie dough is a pretty messy process and takes more space than most people expect. Aim for a surface at least 30” wide by 18” deep so you have plenty of room to move your rolling pin. If you’re using a rolling mat, leave a little buffer space around the edges.
If you’re rolling directly on your countertop (my recommendation), wipe it down, sanitize it, and then dust both the work surface and your rolling pin lightly with flour. This keeps the dough from sticking.
2.
Flour Your Dough on Both Sides
Generously flour both sides of your disc of pie dough, then place it in the center of your work surface.
3.
Pat the Dough into a Larger Circle
Using the heel of your hand, gently press the disc of pie dough outward into a wider circle until it’s about 1” thick. If cracks start to form around the edges, pick the disc up and roll it on its side like a wheel to press the cracks back together. Then finish patting it out.
4.
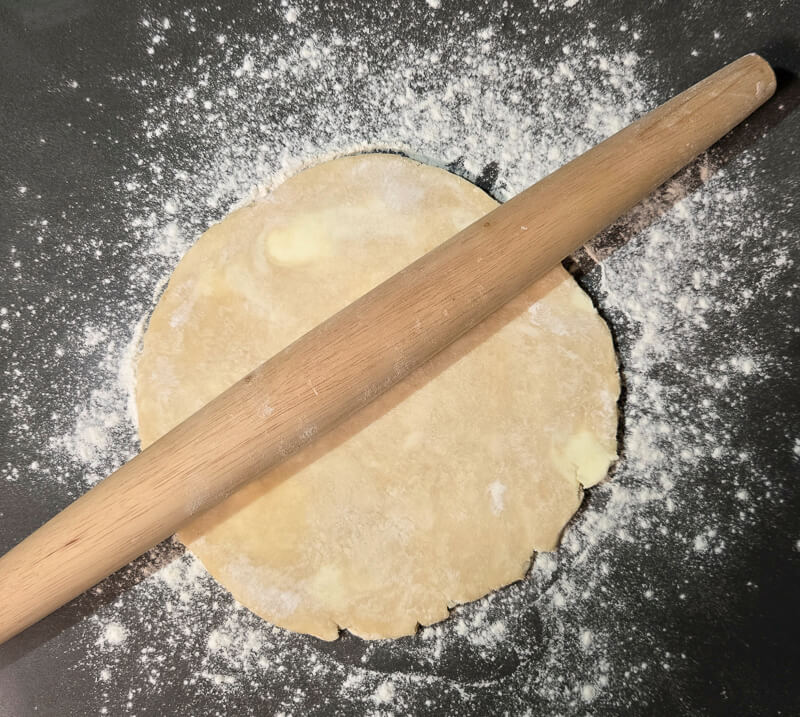
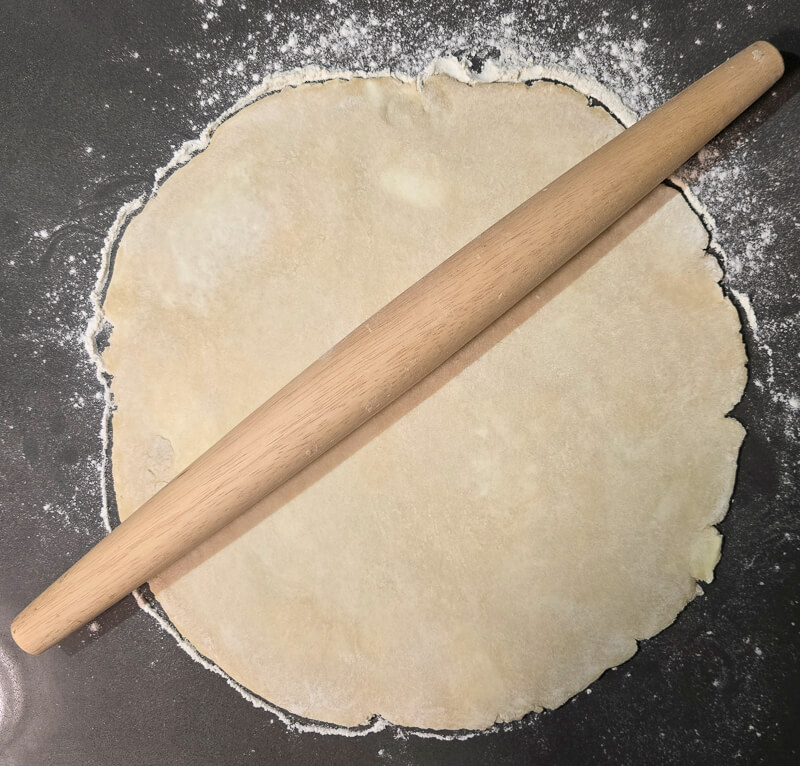
Roll Out the Pie Dough
Using your rolling pin, apply even, firm pressure to roll the dough into a large circle until it’s about 2-3mm thick. To check the size, flip your pie tin upside down over the dough – you want roughly 1” of extra dough extending past the edges of the tin all the way around.
Every few passes, rotate the dough about 30°. When the dough starts to stick, lightly flour the surface, flip the dough over, lightly flour again, and continue rolling. This not only keeps the dough from sticking to your work surface, but also ensures both sides are rolled evenly. Doughs have a kind of “memory” from the gluten formation and will tend to shrink back into its original shape over time. Rolling in multiple directions and on both sides helps prevent shrinking and with keeping your final crust the right size.
5.
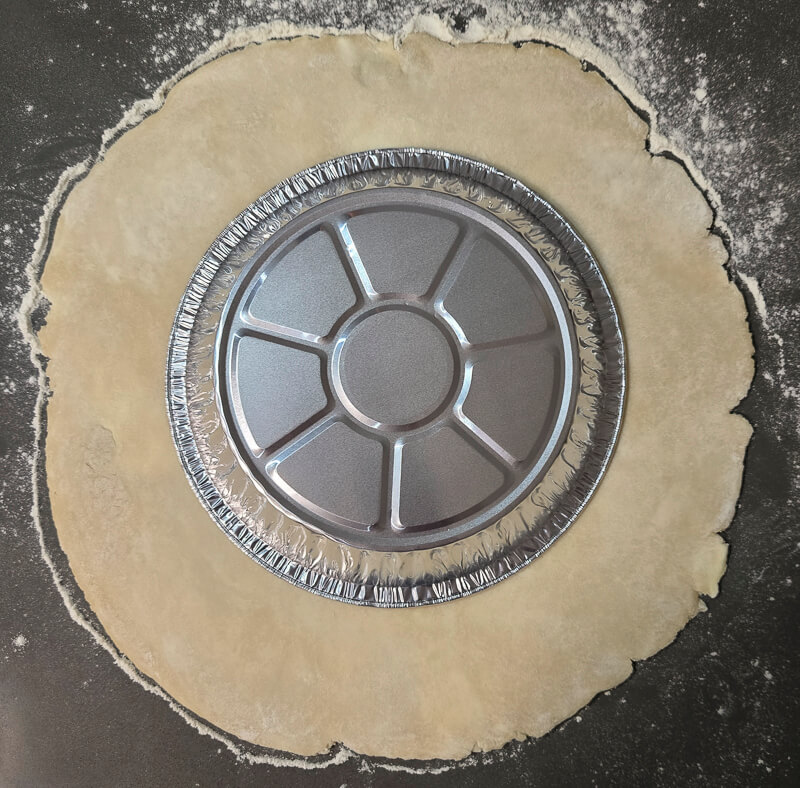
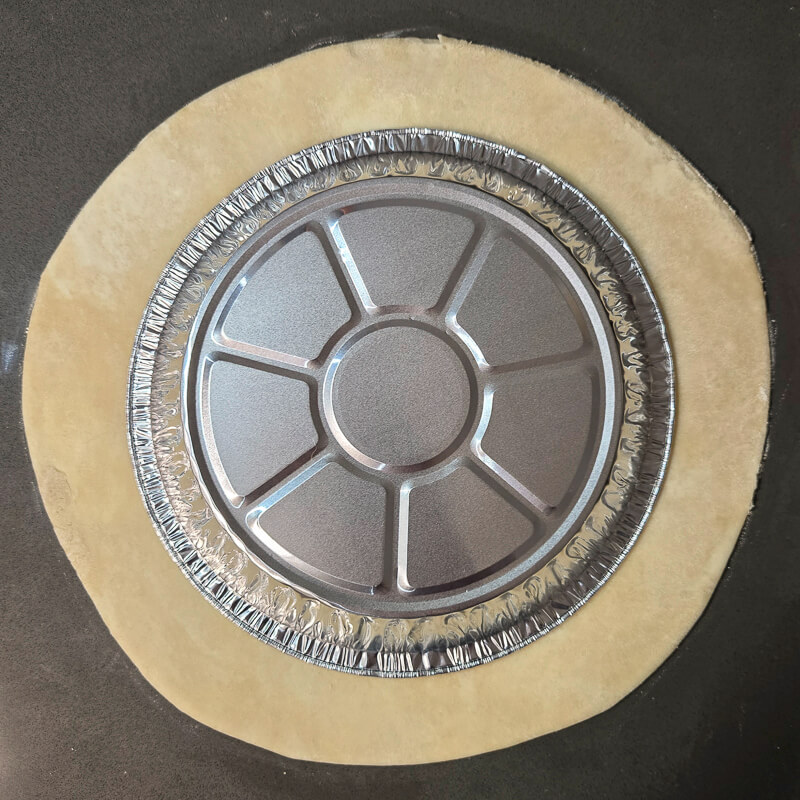
Cut Out the Pie Crust
Place your pie tin upside down over the rolled-out dough to check the size. You should have about 1” of extra dough extending past the edges of your pie tin. Using a pastry wheel or pizza cutter, cut the dough in an even circle, keeping that 1” border all the way around.

6.
Chill the Dough Before Forming
Gluten needs time to relax after being worked. Just like it was important to chill the dough for an hour after mixing before rolling it out, it’s helpful to give it some time to relax again.
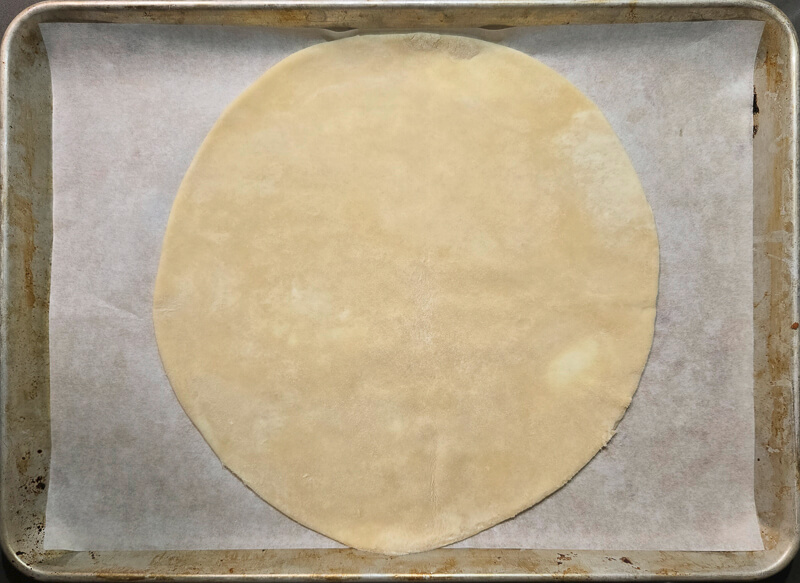
For best results, transfer your circle of pie dough onto a flat surface lined with parchment paper and chill it in the refrigerator for 15-30 minutes. A pizza pan or large cookie sheet works well. To move the dough without tearing it, fold it into quarters, lift it onto the surface, and then unfold it.
This step can also be done ahead of making a pie! Wrap the pan and dough tightly in plastic wrap and store it in the refrigerator for up to 3-5 days. You can even roll out multiple pie crusts, stack them separated with pieces of parchment paper, and freeze them until you’re ready to form a pie crust.
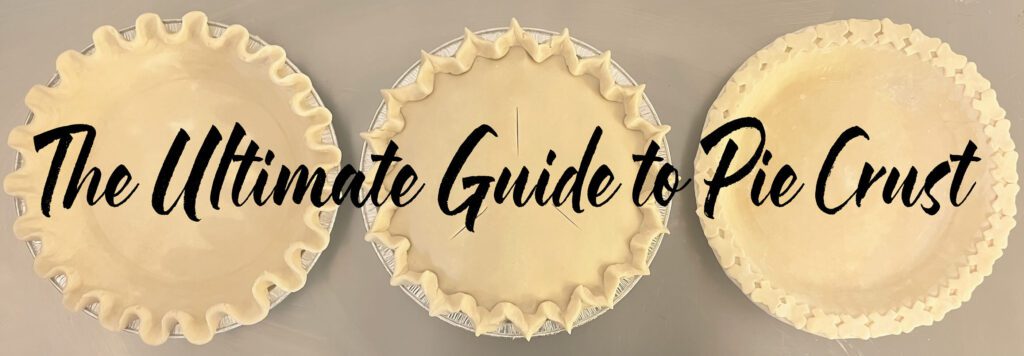
There are countless ways to form a pie crust depending on your comfort level with pie dough and your creativity. In this section, I’ll cover how to form a pie crust ranging from super simple to more advanced pie crust designs. For best results, always, always, always freeze your crust after forming before you bake it. Freezing the crust before it’s baked significantly reduces the likelihood of the crust slumping into the tin while baking!
Forming pie crust can be tricky because pie crust almost always loses a lot of its shape as it bakes. That’s a side effect of a tender, flaky, golden crust. But it can also be frustrating to spend time forming a gorgeous unbaked crust, only to have the details fade away once it’s baked.
For best results, always, always, always freeze your crust after forming and before baking. Freezing the crust helps it hold its structure in the oven, giving you more defined designs. Another tip is to overexaggerate all of your crimping and designs before baking. What looks a little dramatic before baking often looks just right once the crust is done.
Note: This section covers how to form pie shells (think pumpkin or pecan pie). If you’re looking for how to do lattice tops or other double- crusted pie crust designs, check out Part 4: Double-Crusted Pie Crust Designs.
If you make a crust that you’re proud of that’s not covered in this post, tag us on social media and show us your work! We want to see all of your beautiful pie crust creations.
But wait… first you need to get the pie crust into the tin!
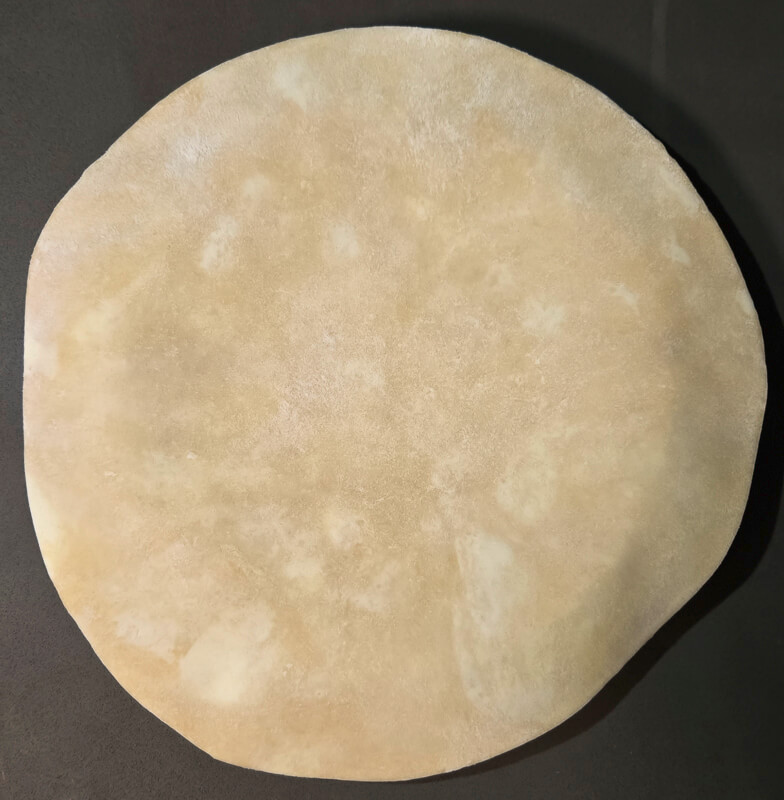
Start by taking your round of rolled pie dough out of the refrigerator. It should feel cool to the touch but still flexible; it should be fairly firm but not so cold that it cracks when bent. If you froze the dough in advance, let it rest until it becomes malleable, either at room temperature or in the refrigerator.
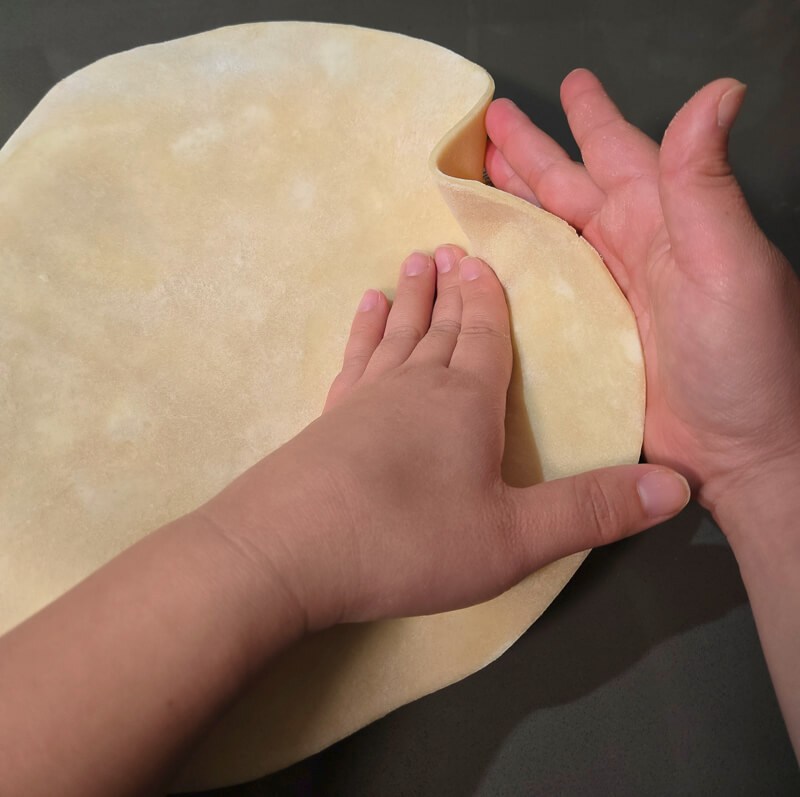
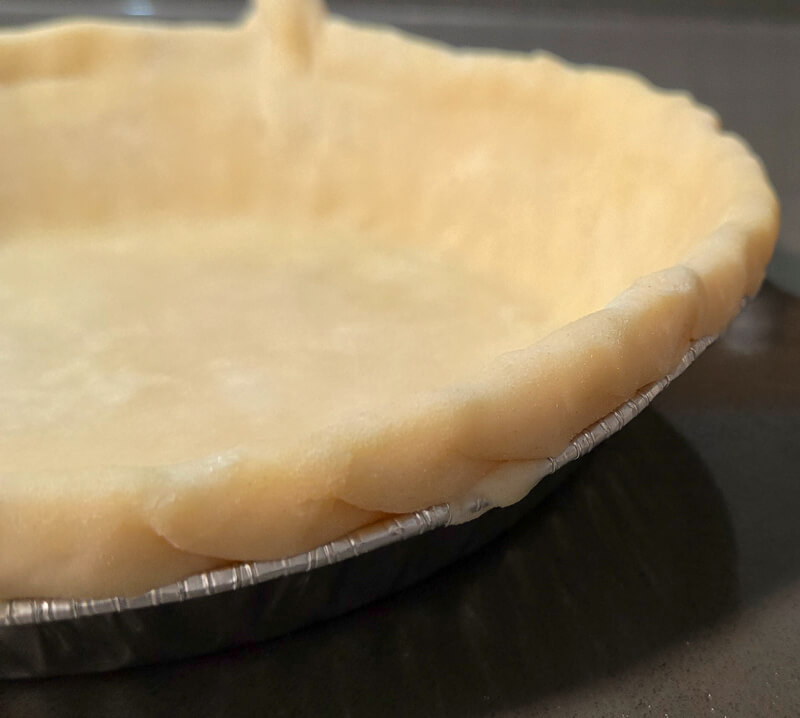
Once the dough is at a good temperature, center the round of dough over your pie tin and adjust it until it’s evenly positioned. Some tutorials suggested wrapping the dough around your rolling pin to transfer it, but if the dough is at the right temperature, it should be sturdy enough to pick it up and move it directly.
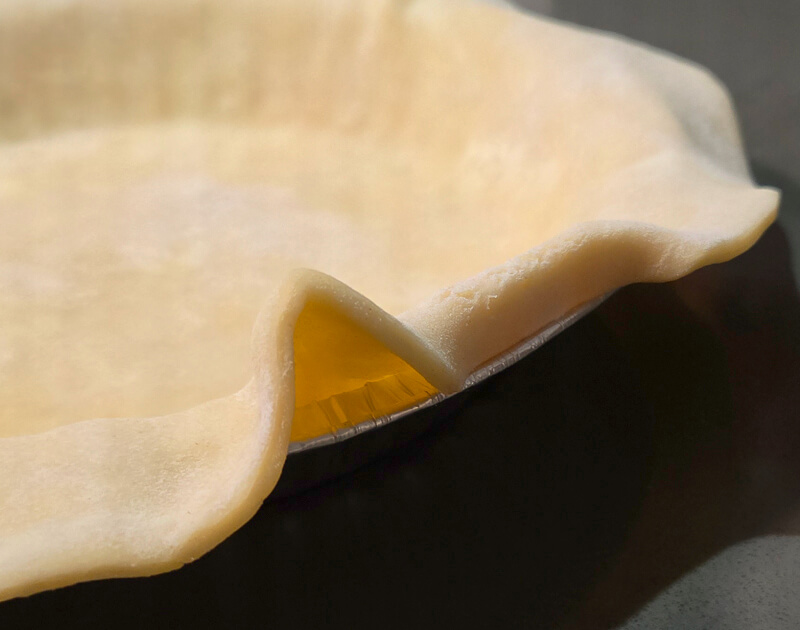
Once centered, gently guide the dough into the corners of the pie tin. Lift the edges slightly with one hand while sliding the dough downward. Avoid stretching or pulling the dough. This will cause the dough to contract while baking and cause the crust to slump into the tin. After fitting the dough fully into the tin, run your fingers along the inside to smooth out the inner crease.
Now your crust is ready to be formed! If the dough has softened while fitting it into the pan, return it to the refrigerator for a few minutes to firm back up before forming.
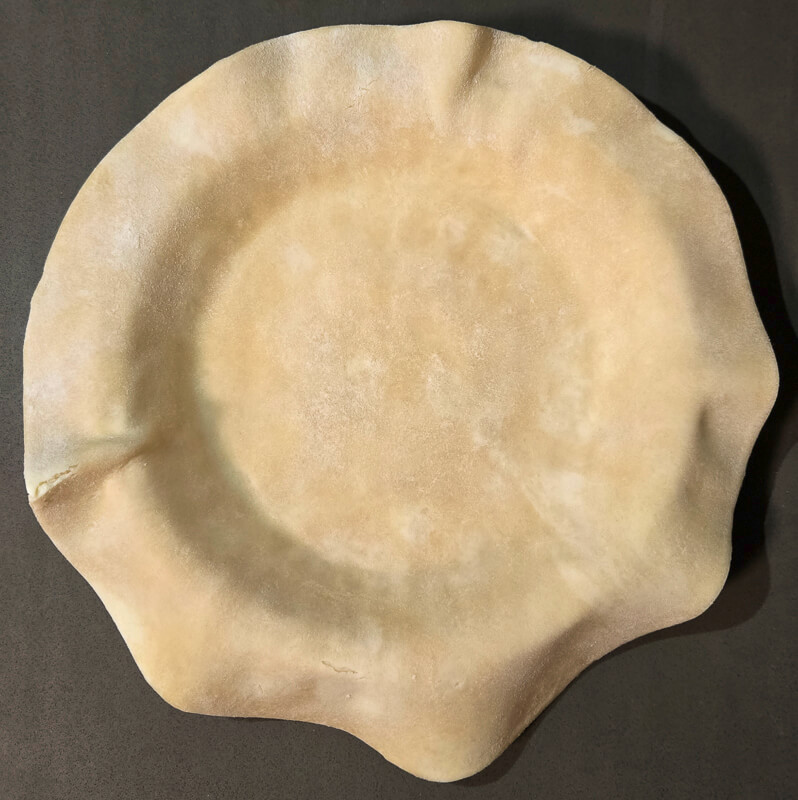
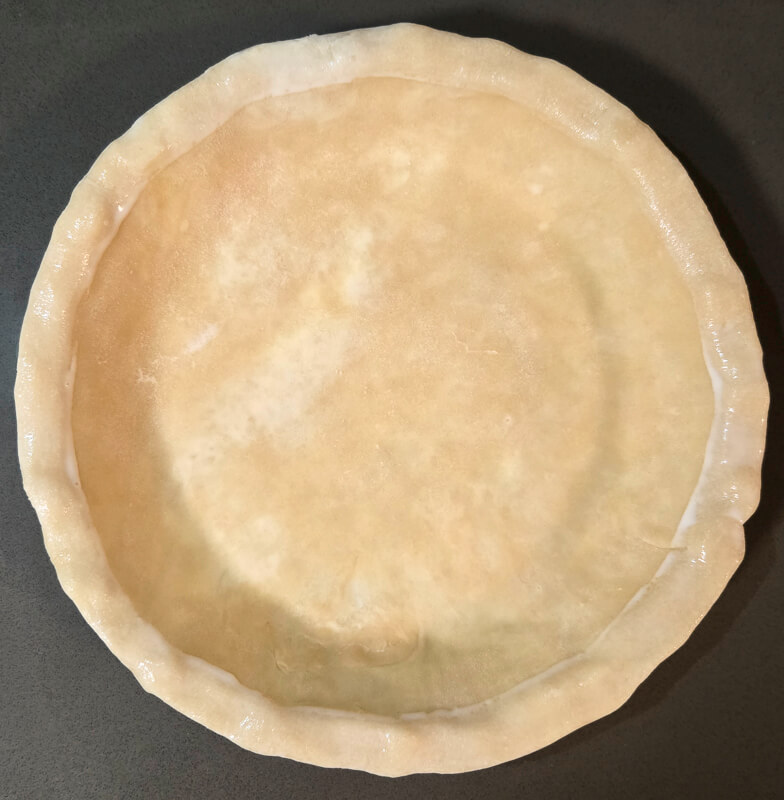
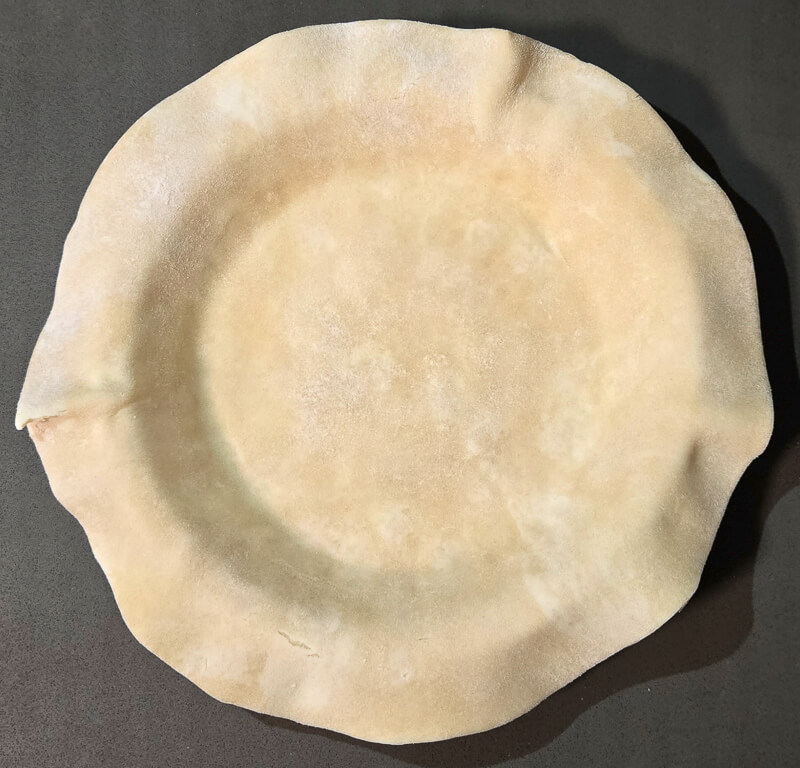
If you’re new to pie baking, or just want the easiest possible approach, this is the method for you. Once your pie crust is fitted into the tin, use kitchen scissors to trim the excess dough so it’s flush with the edge of the pie tin.
That’s it! No fancy crimping, fluting, or decorating – just a simple, neat edge that gets the job done. From here, transfer your pie crust to the freezer until you’re ready to blind bake your pie crust.
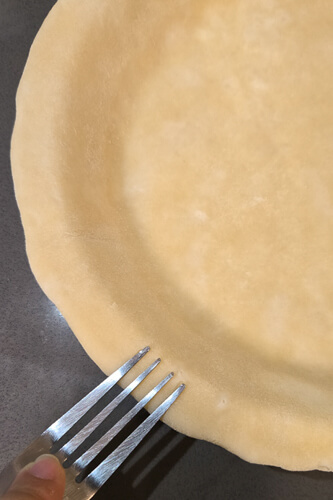
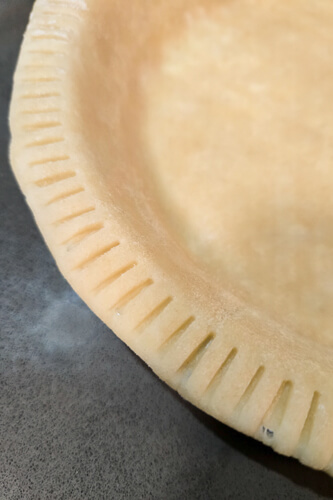
This method builds on the simple press & trim pie crust by adding a little bit of a finishing touch. Once your pie crust is fitted into the tin, trim the overhang with kitchen scissors so the dough is flush with the pan, just like the press & trim method above.
After trimming, use the tines of a fork or the rounded edge of a spoon to press a repeating pattern around the rim of the pie tin. Forks create straight lines, while spoons give you scalloped curves. This is a simple, beginner-friendly way to give your pie crust a polished, decorative look with tools you already have in your kitchen. Once the edges are to your liking, transfer your pie tin to the freezer until you’re ready to blind bake your pie crust.
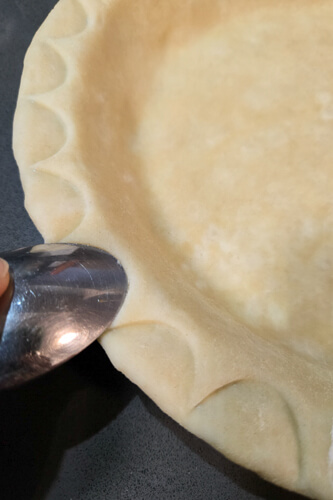
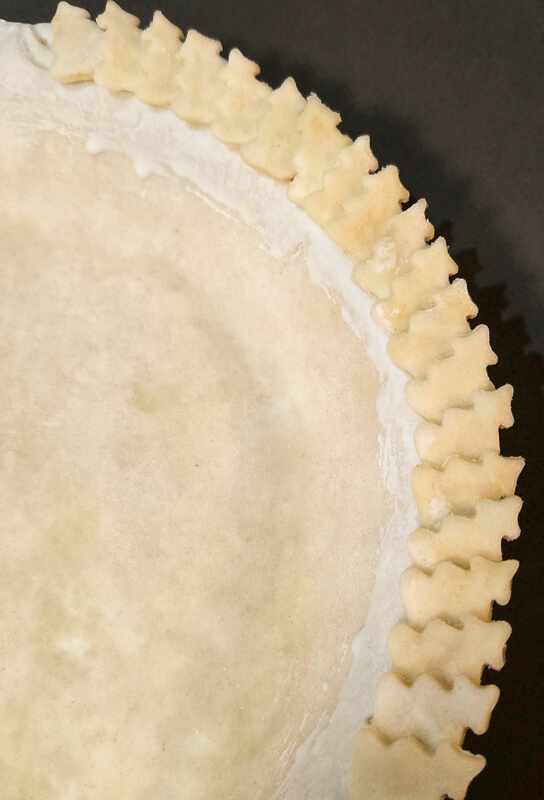
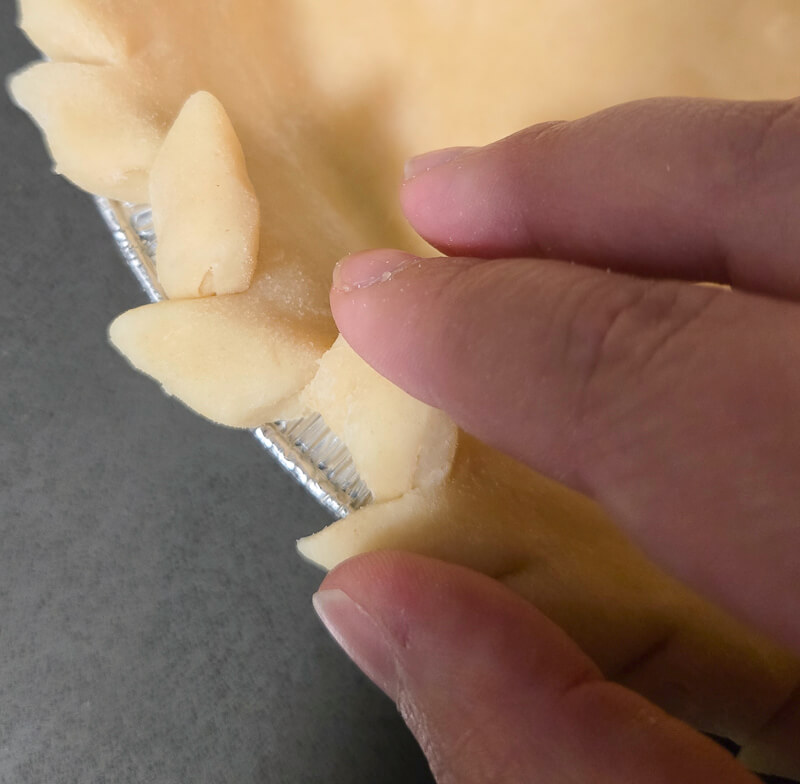
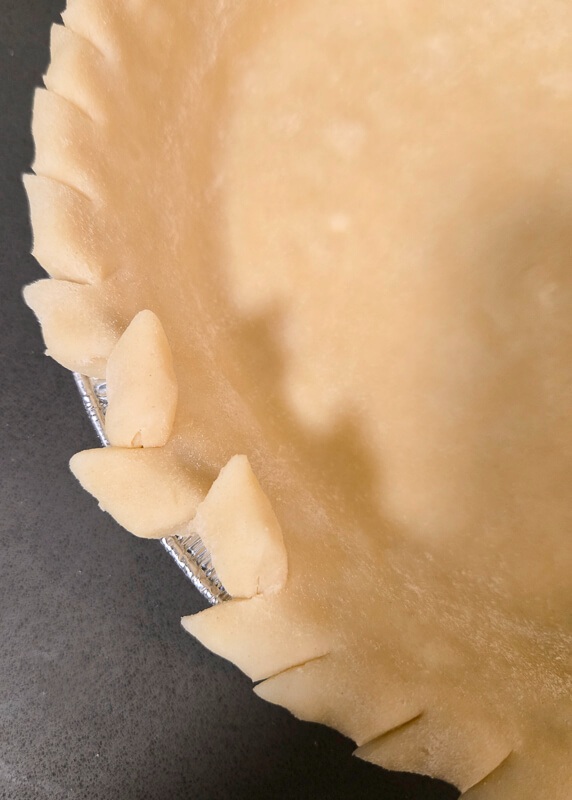
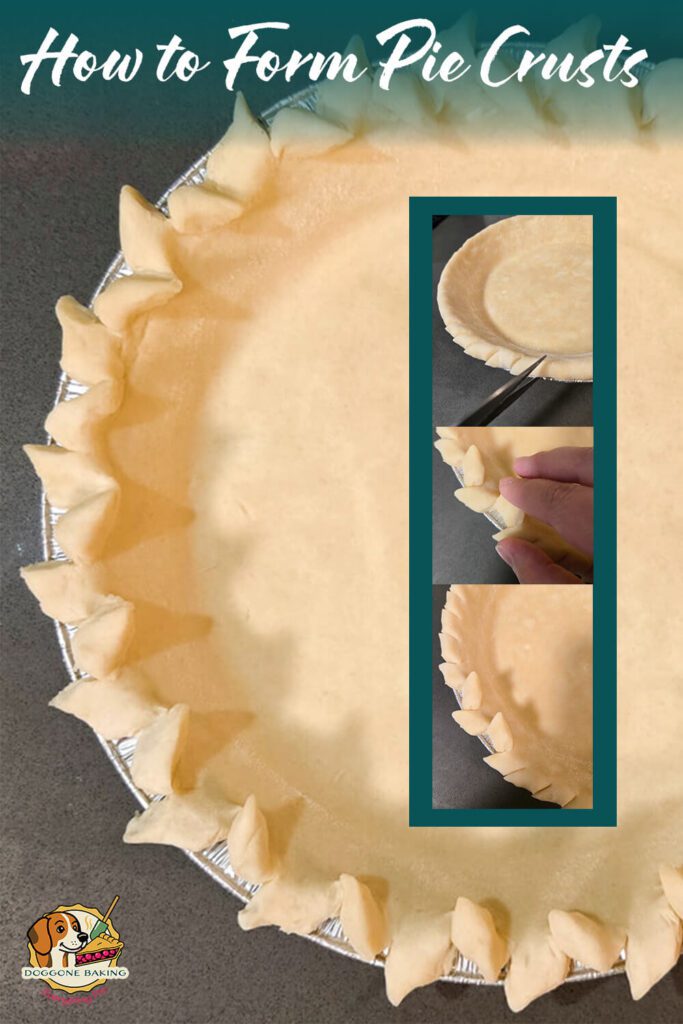
Decorative cut-outs are one of the easiest ways to make your pie look beautiful and intricate without too much work. If you plan to use this method to form your pie crust, you’ll need to make some extra pie dough. An extra half batch of dough, or the double-crusted pie dough recipe should be enough. You’ll also need very small cookie cutters (about ½” wide), a pastry brush (optional), and egg wash.
Before starting, prepare your egg wash. Egg wash works as a kind of “glue” for pie dough. You can make it by whisking one whole egg with 1 tablespoon of water. If you don’t have a pastry brush, you can dab the dough with a clean finger dipped in the egg wash.
Step-by-Step Directions:
1.
Roll out about ⅔ of your pie dough into a round as described above.
2.
Fit your roll-out pie dough round into the pie tin as described above.
3.
Trim the overhang with kitchen scissors so that the dough is flush with the rim. Transfer the fitted crust to the refrigerator until step 6.
4.
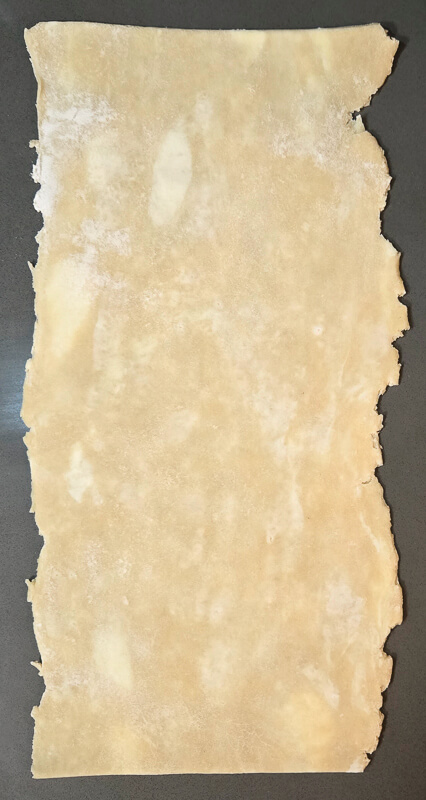
Roll out your extra pie dough (the remaining ⅓) in any shape to about 2mm thick. Transfer to a flat surface such as a parchment-lined cookie sheet, and let chill for 15-30 minutes.
5.
Take your chilled, extra dough and place it on a floured work surface.
6.
Using your small cookie cutters, cut out shapes of your choice.
7.
Remove the fitted crust from the refrigerator and brush the rim with egg wash.
8.
Arrange the dough cut-outs along the rim of the pie tin in your desired pattern. For overlapping designs, brush the backs of the cut-outs with egg wash as well.
This method works with any cookie cutter small enough to fit along the edge of a pie tin (think small stars, hearts, or leaves) and instantly makes your pie look like a centerpiece!
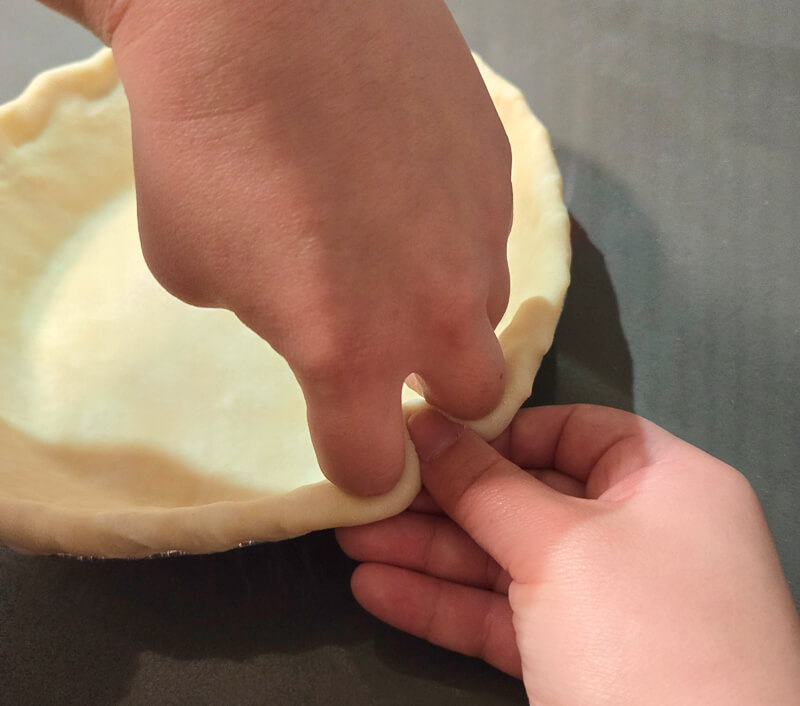
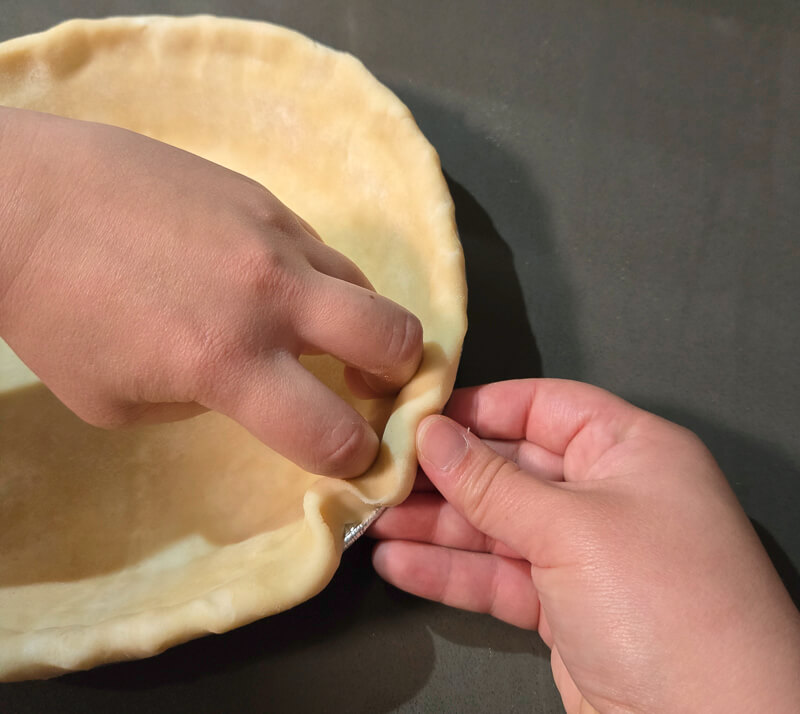
Rolling the Edge of Your Pie Crust
All fluted and crimped pie crusts start with a rolled edge. It may take a little practice to build the muscle memory down, but it’s well worth it when you do! A rolled edge opens up a whole world of decorative pie crust designs.
Step-by-Step Directions:
1.
Start by fitting your pie dough round into your pie tin.
2.
Trim the overhang with a pair of kitchen scissors so that there is about 1” of extra dough all the way around.
3.
At the far edge of the pie (directly across from your body), lift the overhang with both hands.
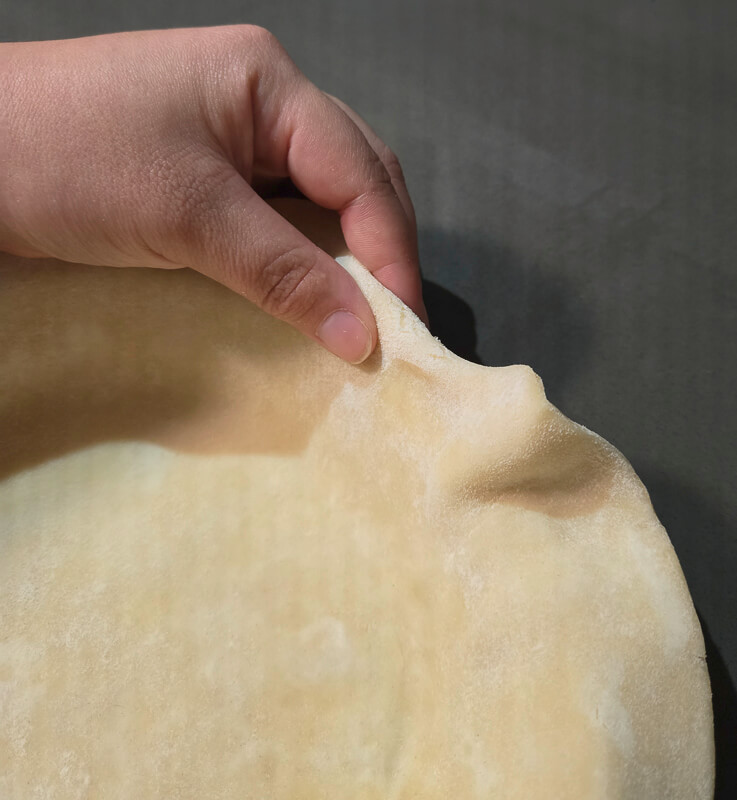
4.
Fold the dough under itself at a 45° angle towards your dominant hand.
5.
Begin twisting, rolling the dough under itself, like a rope, so that the roll sits right on the edge of the pie tin.
6.
Continue rolling all the way around the pie.
7.
When the two ends meet in a triangle, pinch it flat with your fingers and tuck the excess underneath.
Tip: If your crust slumps inwards while baking, you may be pulling the dough too hard as you roll. Avoid stretching the dough out of the pan and roll gently.
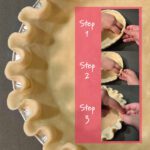
Cut Rope Pie Crust
This decorative pie crust edge looks a bit like leaves on a vine or a wheat stalk. It’s easier to master than a fluted or crimped pie crust but gives your pie a polished, professional finish.
Step-by-Step Directions:
1.
Start by rolling the edge of your pie crust as described above.
2.
Using a pair of kitchen scissors, cut the rope at a 45° angle all the way around the pie.
3.
Gently pull every other tab outward and the alternating tabs inward to create a braided, leafy effect.
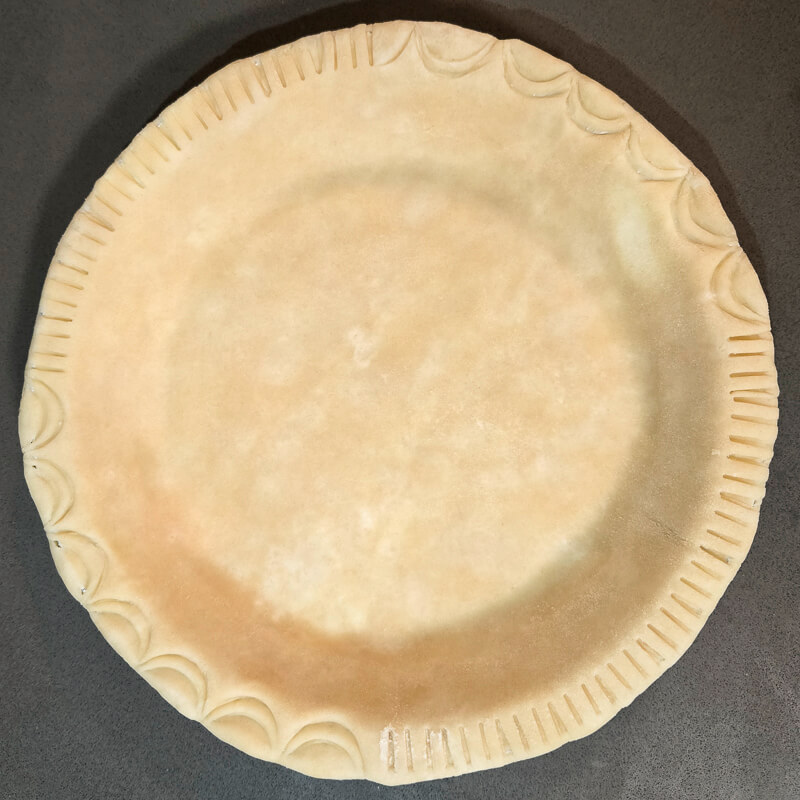
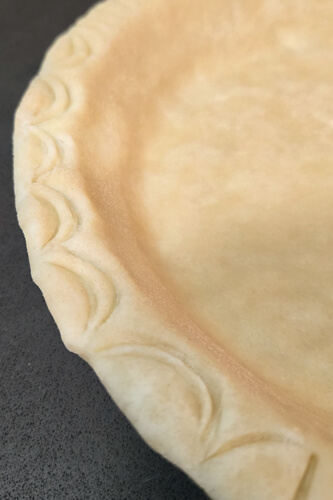
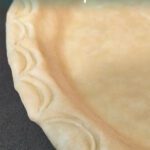
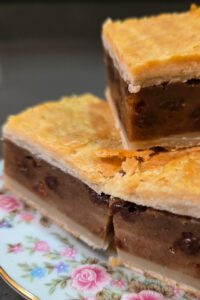
Fluted or Crimped Pie Crust
A fluted or crimped pie crust is the classic scalloped design you probably picture when you think of pies. There are a few different methods for fluting a pie, but this method consistently gives me clean, well-defined flutes.
Step-by-Step Directions:
1.
Start by rolling the edge of your pie crust as described above.
2.
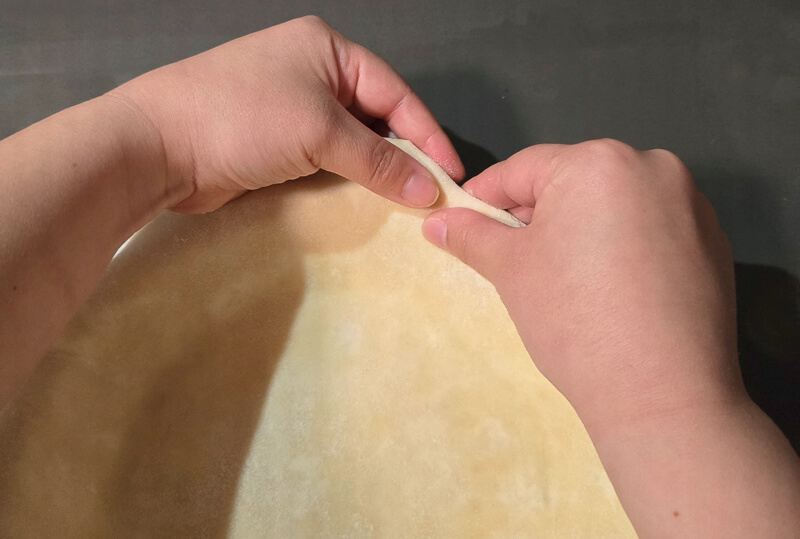
Place the knuckles of your index and middle fingers of your dominant hand on the inside edge of the crust.
3.
Position the thumb of your other hand on the outside edge, between your knuckles from step 2.
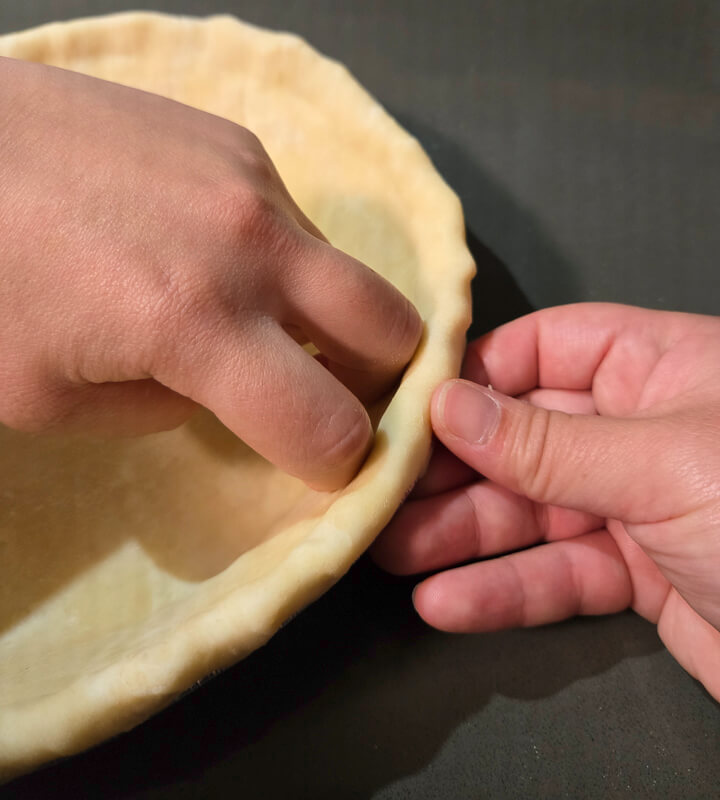
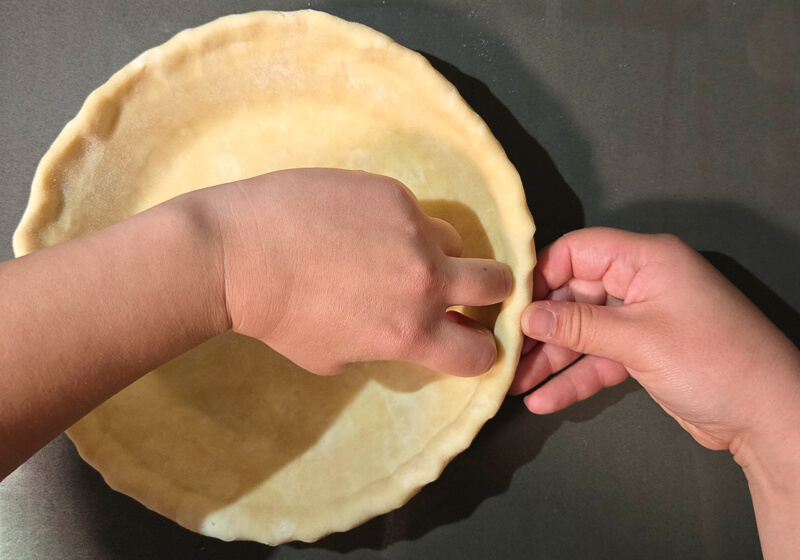
4.
Gently roll your knuckles outward against your thumb to create a flute.
5.
Repeat around the entire pie.
6.
Use the index finger of your dominant hand and the index finger and thumb of your other hand to go back around the pie, defining the flutes.
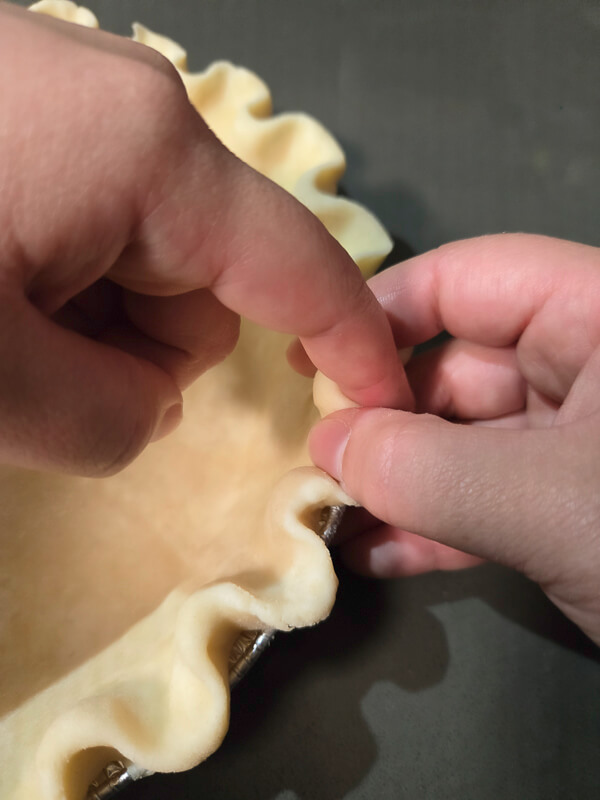
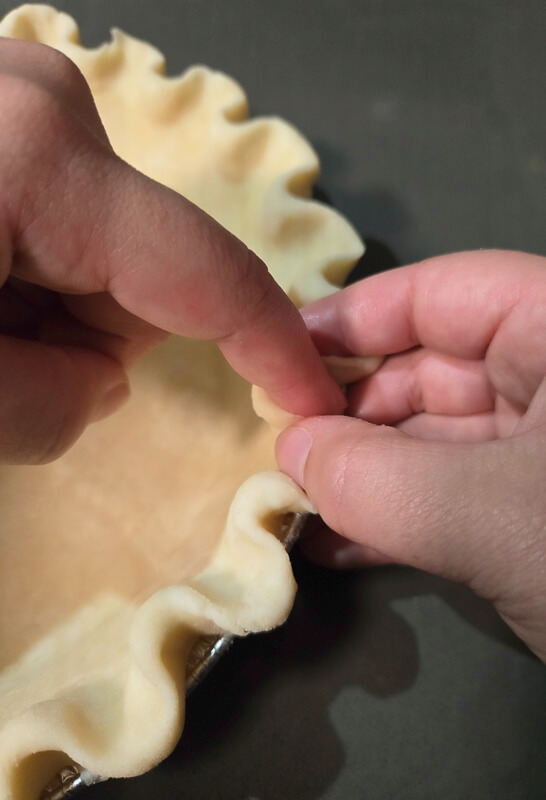
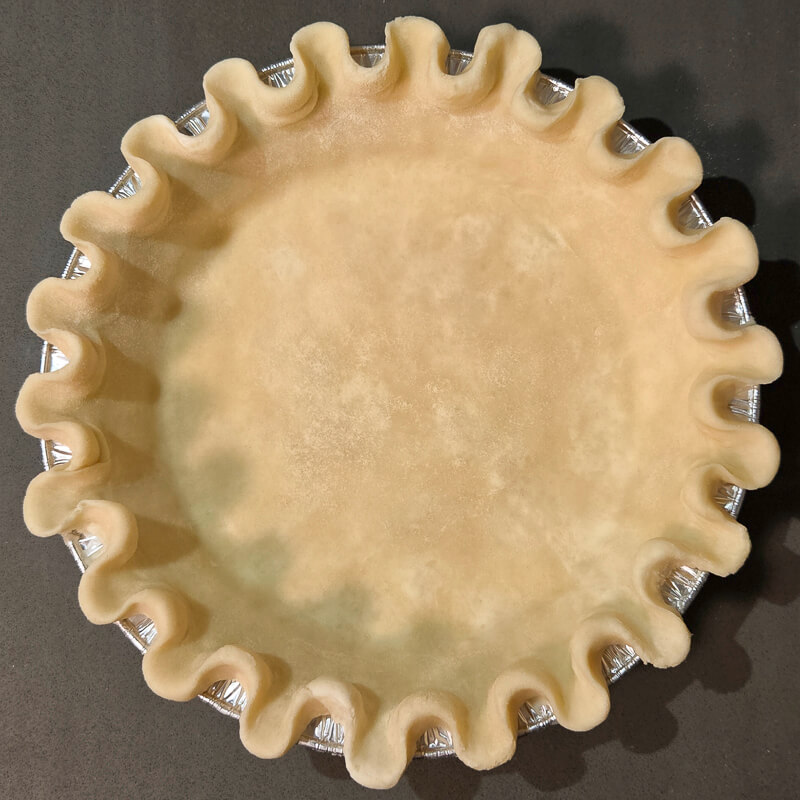
Tip: Experiment with different size flutes! A wider flute gets you a more scalloped edge.
Don’t be discouraged if your first fluted crust doesn’t look bakery perfect! This is a skill that improves with practice.
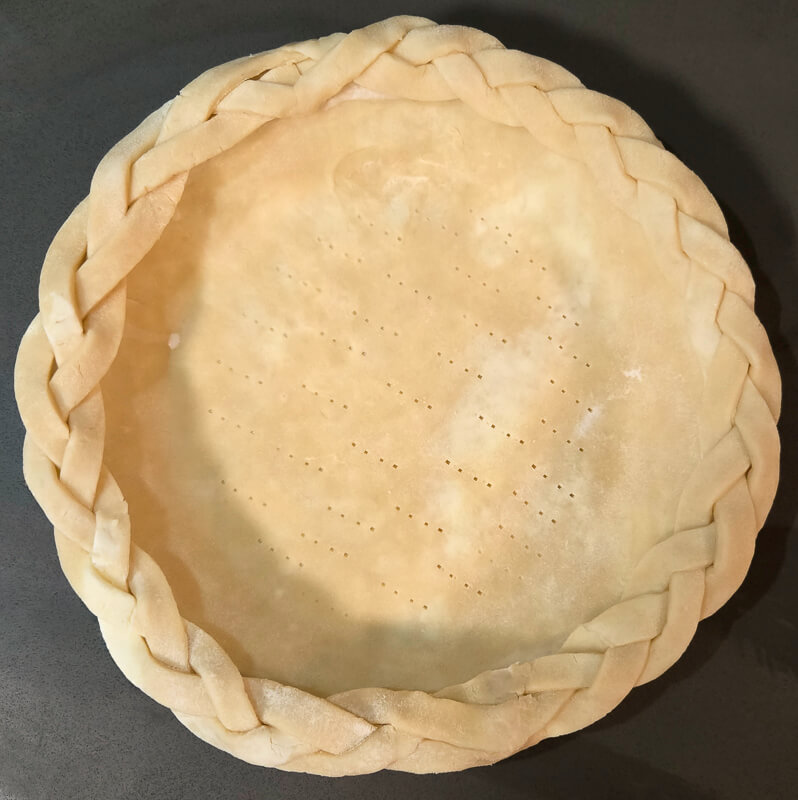
Braids are one of the most stunning ways to decorate a pie crust. They take extra dough, time, and patience, but the result is well worth the effort. If you plan to use this method to form your pie crust, you’ll need to make some extra pie dough – double the recipe for a 9-10” pie shell. These directions are for a classic 3-strand braided pie crust, but you can experiment with other braid styles for unique designs!
You’ll also need a few other tools:
Step-by-Step Directions:
1.
Roll out about ½ of your pie dough into a round as described above.
2.
Fit the round into your pie tin.
3.
Trim the overhang with kitchen scissors so that the dough is flush with the rim. Transfer the fitted crust to the refrigerator until step 7.
4.
Roll out the rest of the dough in a long rectangle about 2.5” wide and about 12” long until the dough is about 2mm thick. Transfer to a flat surface such as a parchment-lined cookie sheet, and let chill for 15-30 minutes.

5.
Using a 5-wheel pastry cutter, cut the chilled dough into long strips about ¼” wide. You should have at least 9 strips.
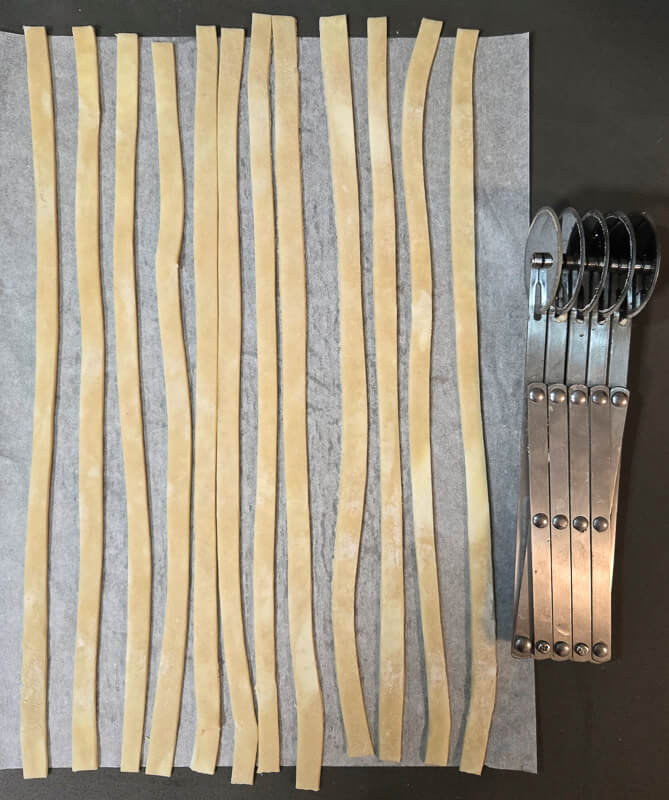
6.
Braid the strips into three 3-strand braids (see photos). You’ll need a total of about 30” of braid for a standard 9” pie.


7.
Remove the fitted crust from the refrigerator and brush the rim with egg wash.
8.
Lay the first braid along the rim of the pie crust, pressing gently to secure it into place.
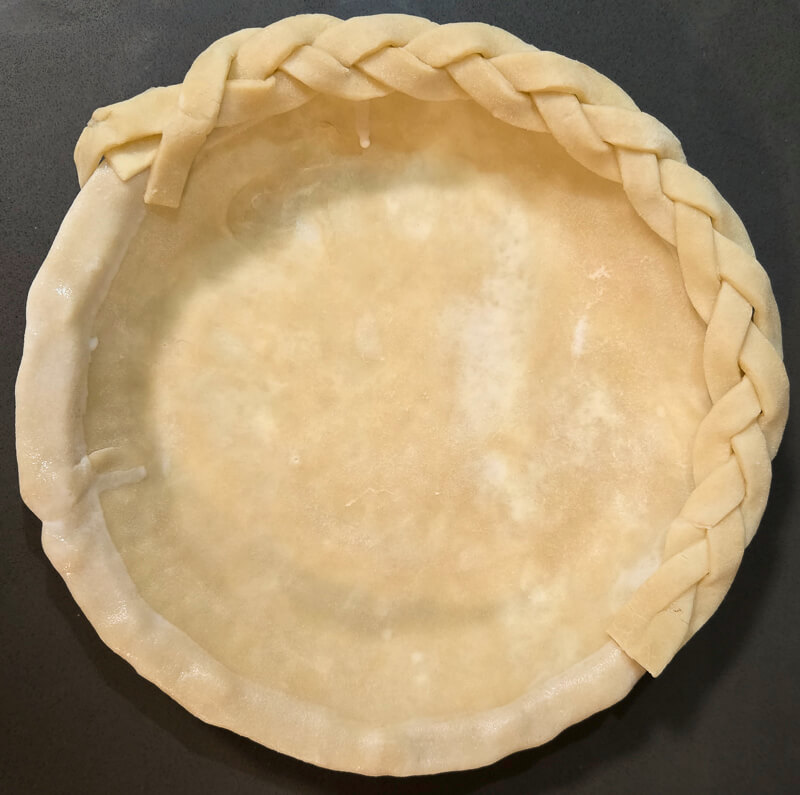
9.
When you reach the end of the braid, join the next braid by tucking and pinching the ends together, then continue around the pie.
10.
Once you’ve circled the entire pie, cut away any excess length, and join the final ends together as neatly as possible.
Tip: Don’t stress out over uneven braids. Once baked, slight imperfections tend to blend into the design.
This method takes practice, so don’t be discouraged if your first attempt isn’t picture-perfect. Over time, your braided pie crust will look cleaner and more even.
There are countless ways to decorate pie crusts! Hopefully these ideas give you a place to start, but we’d love to see your original designs as well. If you try one of these methods (or come up with your own!), tag us on Instagram so we can see your creations.
Looking for more inspiration? Check out Part IV: Double-Crusted Pie Designs for lattice designs, cut-outs, and other decorative pie tops.
Jennifer Sterbenz
Doggone Baking
In 2016, I left my office job and became a professional baker. These days I spend my days testing recipes and baking pies while my two dogs snooze happily nearby.


One Comment
I’m a competent cook but I have always had a terrible time with pie crust. This post helped me so much! Thank you!